
How to install Rancher RKE2 on CentOS Stream 8
In this technical blog post, I will explain how to set up the new Rancher Kubernetes Distribution RKE2 on CentOS 8 Stream. Before explaining how to install Rancher RKE2 on CentOS Stream 8, let’s discuss the components of such a set-up.
What is CentOS 8 Stream?
You might already know that CentOS is a Linux distribution. Maybe you’re also aware that it provides a free, community-supported computing platform functionally compatible with Red Hat Enterprise Linux (RHEL). However, the ‘new’ CentOS, which is called CentOS Stream, actually works the other way around. Features will first be released on CentOS Stream, and only released to RHEL afterwards. This means CentOS Stream will be similar to Fedora. As most bugs will be patched on Fedora and CentOS Stream before they are released to RHEL, RHEL should be the most stable.
For now, there is still a ‘regular’ CentOS 8 you can download, but this will soon change. CentOS has stated that ‘the future is CentOS Stream‘ and set the EOL date for CentOS 8 on the 31st of December 2021.
What is Rancher?
The official website describes Rancher as ‘a complete software stack for teams adopting containers’. Rancher addresses the operational and security challenges of managing multiple Kubernetes clusters across any infrastructure, while providing DevOps teams with integrated tools for running containerized workloads. Basically, it’s a tool which provides an easy way to set up one or more Kubernetes clusters and provides a lot of features out of the box, such as security, a centralized software catalog, unified cluster management and so much more. In short, Rancher is the software that runs on a Kubernetes cluster.
What is RKE2?
You can create a Kubernetes cluster using RKE2 (or RKE1), but this is not a requirement. RKE2 (Rancher Kubernetes Engine), also known as RKE Gov(ernment), is basically a combination of RKE1 and K3s.
- From K3s, it inherits the usability, ease-of-operations, and deployment model.
- From RKE1, it inherits close alignment with upstream Kubernetes.
RKE2 does not rely on Docker. Instead, it launches control plane components as static pods, managed by the kubelet. The embedded container runtime is containered. The diagram below shows the topology of an RKE2 cluster.
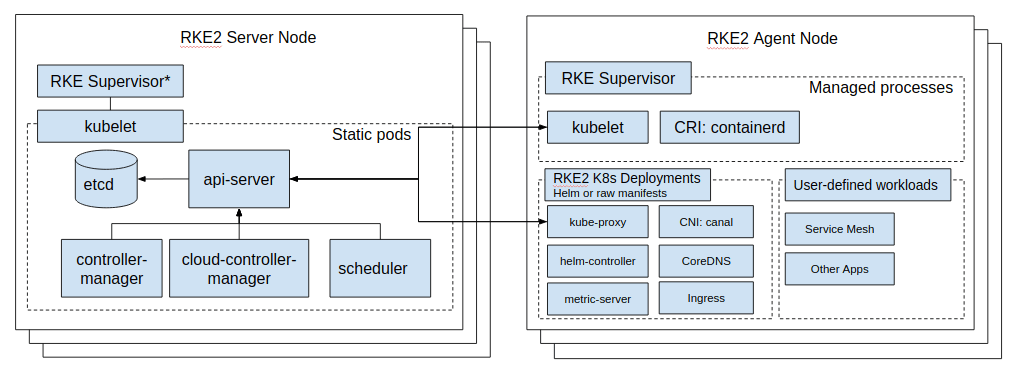
You can find more information on RKE2 architecture here.
Setting up nodes
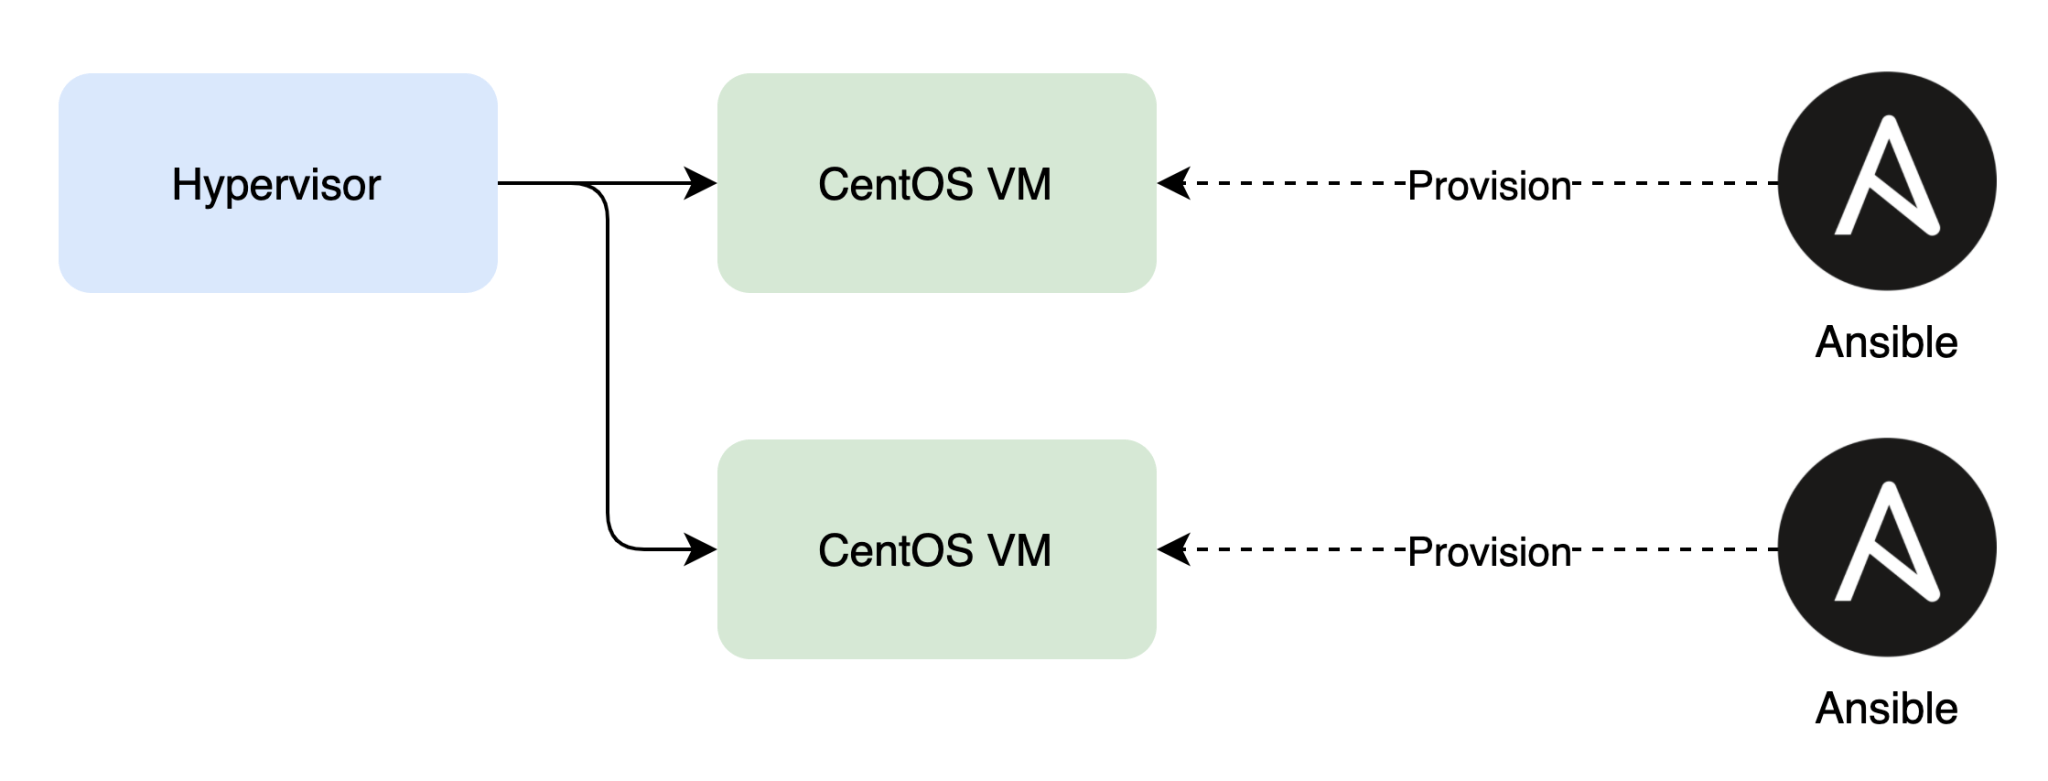
When setting up nodes, you have a choice to either set up a server (master) node or an agent (worker) node. In both cases, you’ll want to automate this process using Ansible. After all, you don’t want to repeat the steps every time you set up a new node.
For this tutorial blog post, we’ll set up this architecture using RKE2.
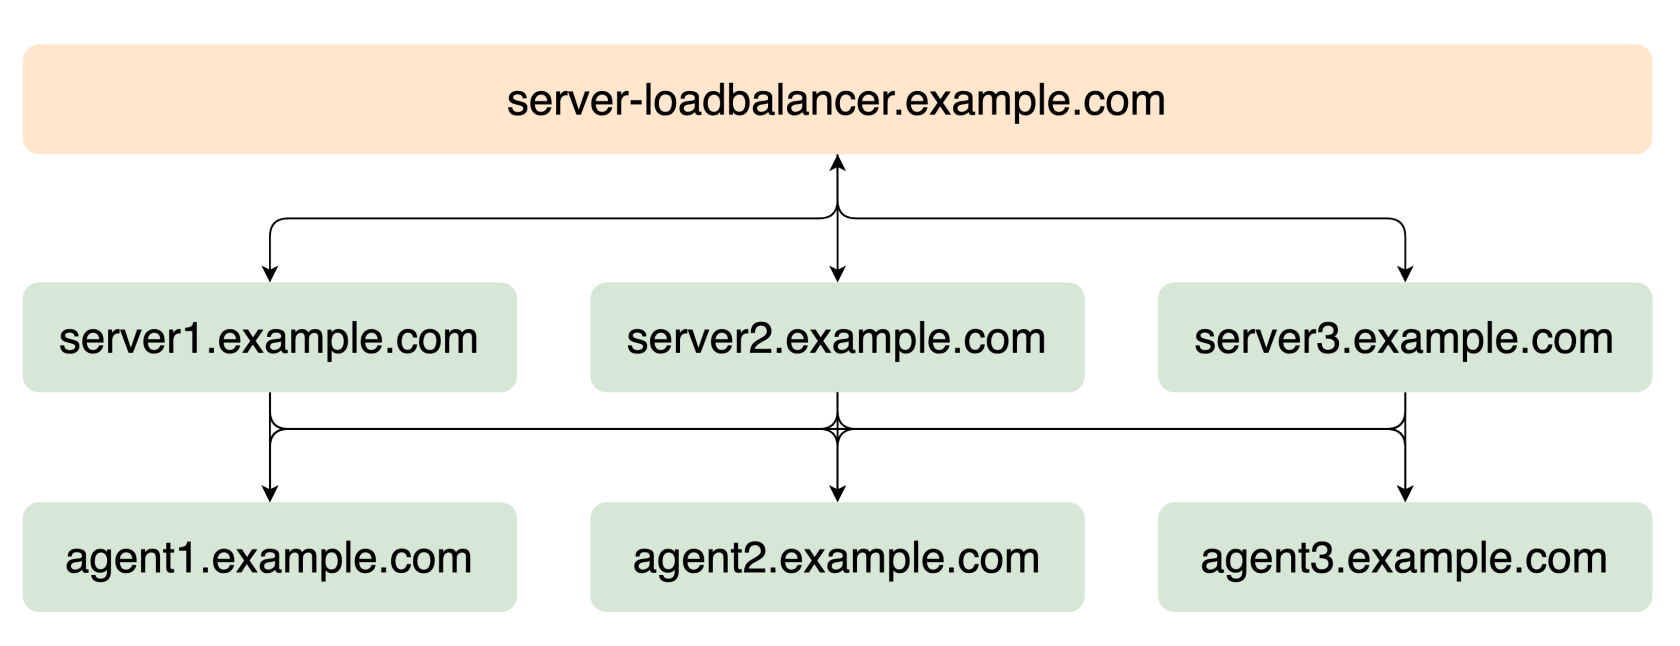
Make sure that the node names are resolvable via DNS and to add DNS entries. That way, each node can do a DNS lookup to connect to other nodes.
For example:
server1.example.com          IN A    10.100.100.1
server2.example.com          IN A    10.100.100.2
server3.example.com          IN A    10.100.100.3
agent1.example.com           IN A    10.100.100.11
agent2.example.com           IN A    10.100.100.12
agent3.example.com           IN A    10.100.100.13
Depending on the node type, you’ll either install the rke2-server or rke2-agent package using Yum. Make sure to add the following Yum repositories so the packages can be installed:
[rancher-rke2-common-latest]
name=Rancher RKE2 Common Latest
baseurl=https://rpm.rancher.io/rke2/latest/common/centos/8/noarch
enabled=1
gpgcheck=1
gpgkey=https://rpm.rancher.io/public.key

[rancher-rke2-1-18-latest]
name=Rancher RKE2 1.18 Latest
baseurl=https://rpm.rancher.io/rke2/latest/1.18/centos/8/x86_64
enabled=1
gpgcheck=1
gpgkey=https://rpm.rancher.io/public.key
You can validate the documentation here for known issues and here for advanced options.
Since we are using nftables, we will disable firewalld and enable nftables.
systemctl stop firewalld
systemctl disable firewalld
systemctl start nftables
systemctl enable nftables
If you are using a DENY by default policy, you will have to add nftables rules in /etc/nftables/main.nft to allow the required traffic. You can find the documentation for this here.
Setting up the first Server Node
First, install the rke2-server package.
yum install rke2-serverThen, add the node configuration to /etc/rancher/rke2/config.yaml.
write-kubeconfig-mode: "0644"
tls-san:
  - "example.com"
node-label:
  - "nodetype=master"
cluster-cidr: "10.42.0.0/16"
service-cidr: "10.43.0.0/16"
cluster-dns: "10.43.0.10"
cluster-domain: "example.com"
Next up, add additional configuration to /etc/sysconfig/rke2-server. If you use a proxy server, you should add it in this step.
HOME=/root
RKE2_SELINUX=true
http_proxy=http://proxy.example.com:80/
https_proxy=http://proxy.example.com:80/
ftp_proxy=http://proxy.example.com:80/
no_proxy=.example.com,169.254.169.254,10.0.0.0/24
Additionally, you’ll have to instruct Canal that you’re using nftables, as documented here. You’ll need to create a file /var/lib/rancher/rke2/server/manifests/rke2-canal-config.yaml.
2
3
4
5
6
7
8
9
apiVersion: helm.cattle.io/v1
kind: HelmChartConfig
metadata:
  name: rke2-canal
  namespace: kube-system
spec:
  valuesContent: |-
    calico:
      felixIptablesBackend: "nft"
Now, you can start the rke2-server with the provided information.
systemctl start rke2-server
systemctl enable rke2-server
You can now configure your kubectl for easy access, as documented here.
In order to view this content, you need to accept Marketing & third party cookies.
Click here to adjust your preferencesFollow the progress using the following commands:
kubectl get nodes
kubectl get pods -A
Find and note down the token somewhere safe. You’ll need this token to add the other nodes to the cluster.
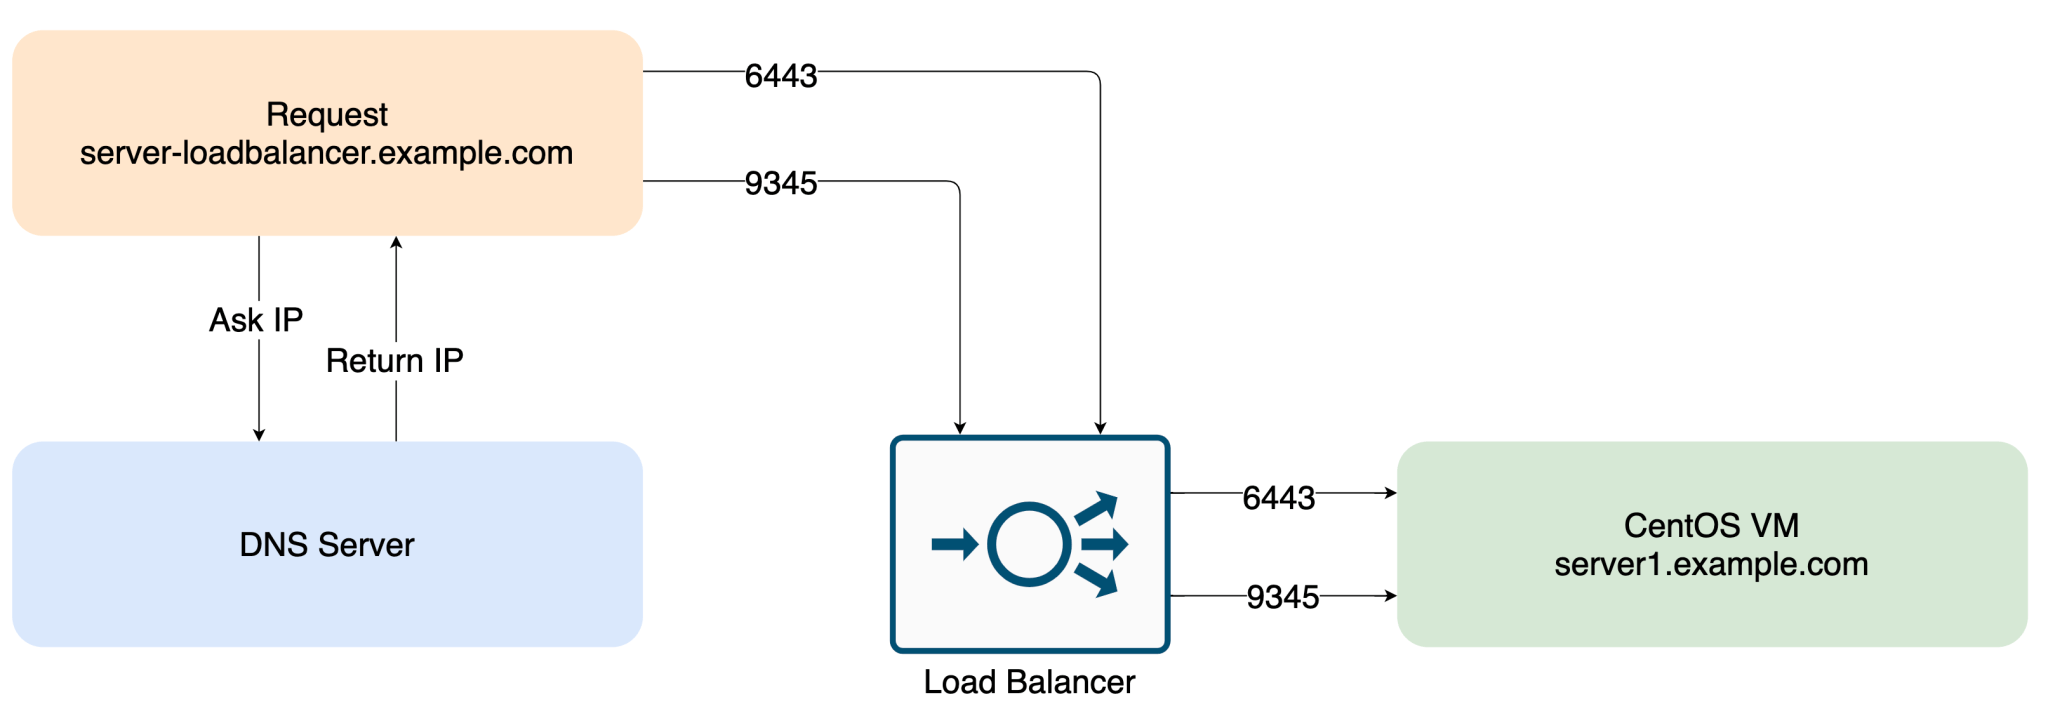
cat /var/lib/rancher/rke2/server/node-tokenSetting up the load balancer in front of the first server node
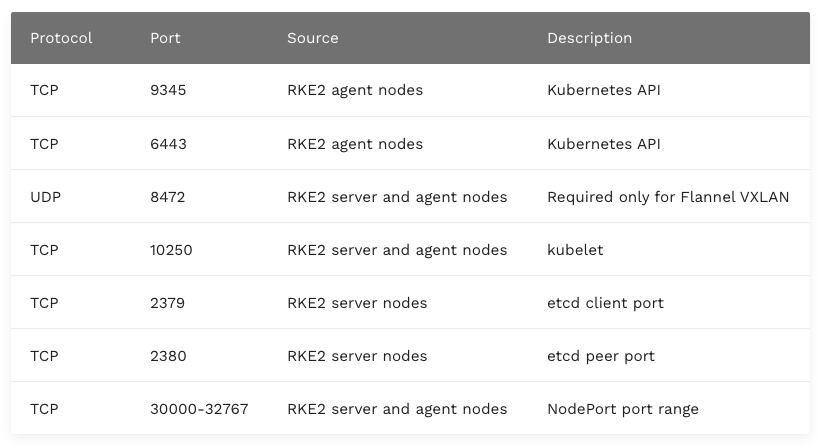
This step depends heavily on the load balancer solution that is running within the datacenter or in the cloud. You should create a DNS entry that points to the load balancer, for example server-loadbalancer.example.com When the request hits the load balancer, it should forward the requests to the server node. This should work for TCP ports 9345 and 6443. Make sure that at this point, only the server node we configured in the previous step will get the requests. You can find more information here.
Setting up additional Server Nodes
yum install rke2-serverThen, add the node configuration to /etc/rancher/rke2/config.yaml.
server: https://server-loadbalancer.example.com:9345
token: [token from /var/lib/rancher/rke2/server/node-token on agent1]
write-kubeconfig-mode: "0644"
tls-san:
  - "example.com"
Next, add additional configuration to /etc/sysconfig/rke2-server. Again, if you use a proxy server, you should add this here.
HOME=/root
RKE2_SELINUX=true
http_proxy=http://proxy.example.com:80/
https_proxy=http://proxy.example.com:80/
ftp_proxy=http://proxy.example.com:80/
no_proxy=.example.com,169.254.169.254,10.0.0.0/24
Now, you can start the rke2-server with the provided information.
systemctl start rke2-server
systemctl enable rke2-server
That’s it! Repeat these steps for all additional server nodes.
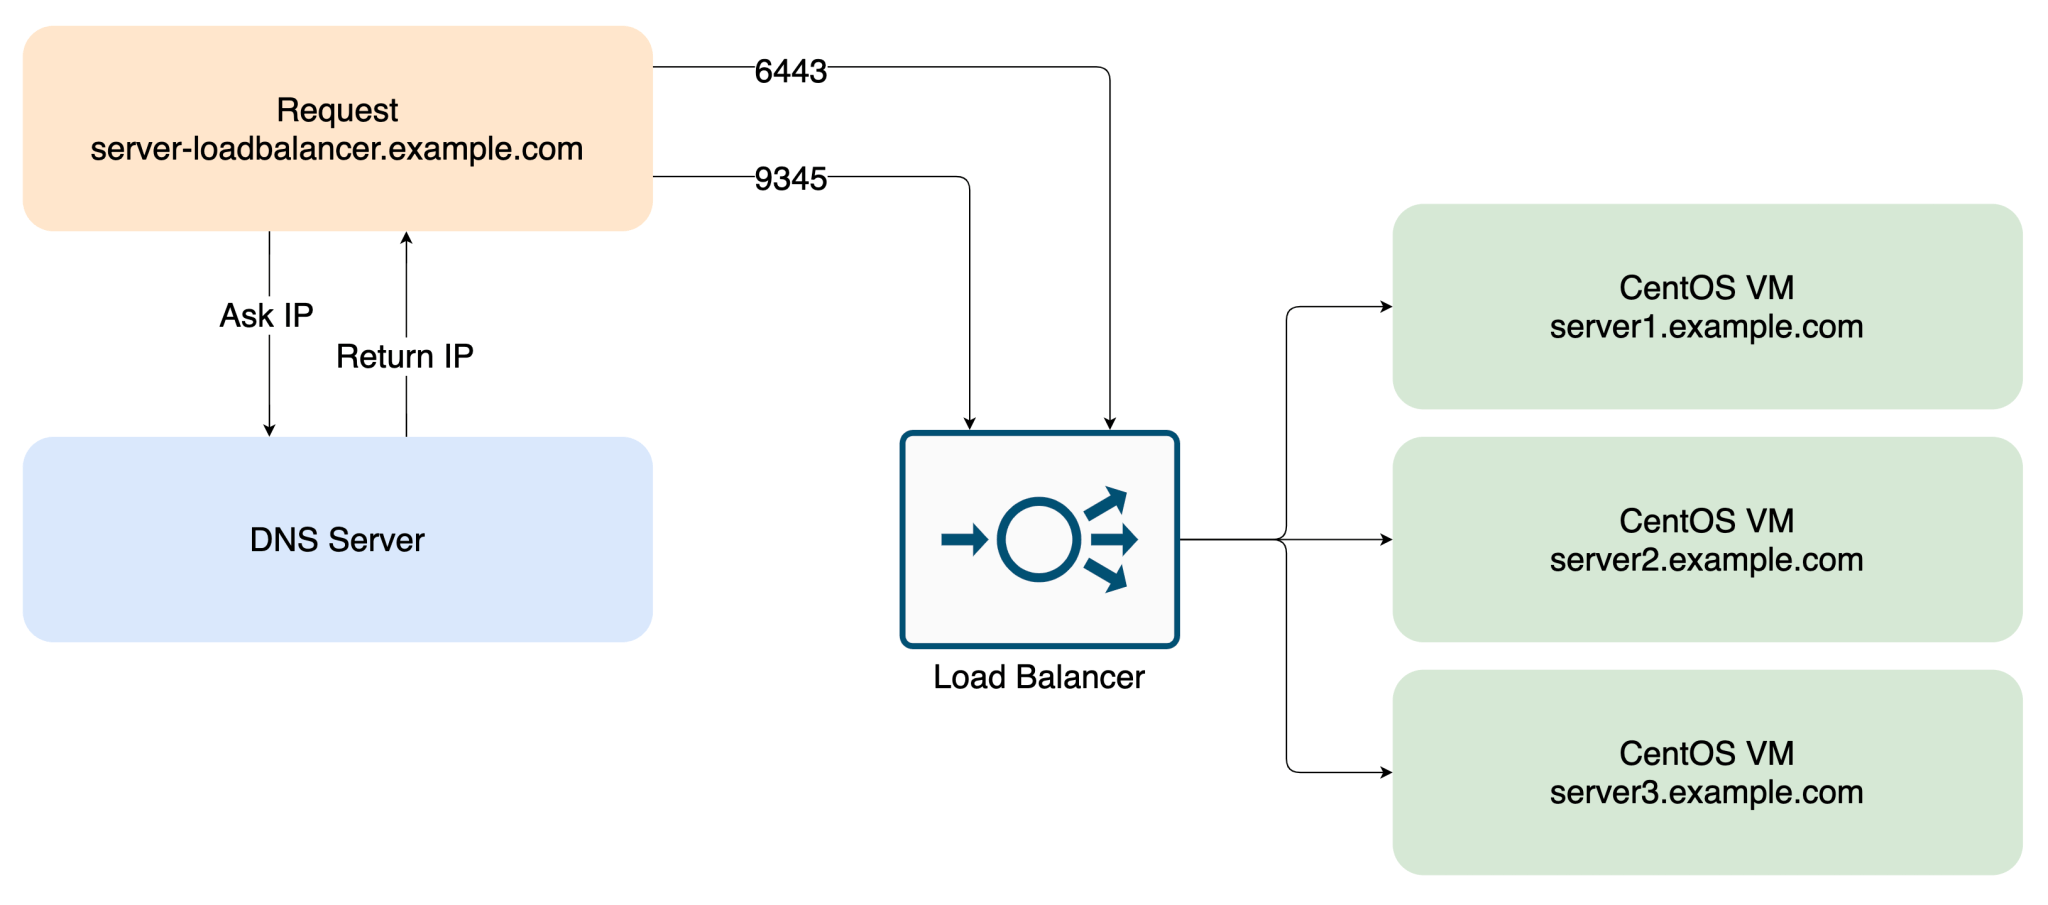
Adding the other nodes to the load balancer in front of the server nodes
Add all created server nodes as target for the load balancer.
Setting up Agent Nodes
Apart from installing another yum package, the setup is similar to adding additional server nodes
First, install the rke2-agent package.
yum install rke2-agentThen, add the node configuration to /etc/rancher/rke2/config.yaml.
server: https://server-loadbalancer.example.com:9345
token: [token from /var/lib/rancher/rke2/server/node-token on agent1]
write-kubeconfig-mode: "0644"
tls-san:
  - "example.com"
Next, add additional configuration to /etc/sysconfig/rke2-agent. Once more, if you use a proxy server, you should add this here.
HOME=/root
RKE2_SELINUX=true
http_proxy=http://proxy.example.com:80/
https_proxy=http://proxy.example.com:80/
ftp_proxy=http://proxy.example.com:80/
no_proxy=.example.com,169.254.169.254,10.0.0.0/24
Now you can start the rke2-agent with the provided information.
systemctl start rke2-agent
systemctl enable rke2-agent
Done! Repeat these steps for all additional agent nodes.
Installing Rancher
Now that we have a functional RKE2 cluster, you will need to add the Rancher resources to the cluster. You can find most information on this using this guide from Rancher. In this case, we’ll be installing this using helm.
Install Helm
To keep things simple, we’ll be running these commands on the first server node, as kubectl is already configured there. You could also install kubectl and helm on your local machine and point the kubeconfig to the cluster (assuming the cluster is reachable from your network). I actually advise the second method, since we won’t be installing extra software on the agent node. To install helm, you can follow the steps here.
curl -fsSL -o get_helm.sh https://raw.githubusercontent.com/helm/helm/master/scripts/get-helm-3
chmod 700 get_helm.sh
./get_helm.sh
Add helm repo
I recommend you use the stable version for this.
helm repo add rancher-stable https://releases.rancher.com/server-charts/stableCreate namespace for rancher
The rancher resources will be created in this Kubernetes namespace.
kubectl create namespace cattle-systemInstall cert-manager
We will be using self-signed certificates for now. The cert-manager tool can generate these automatically. Note: if you bring your own certificates, this step is not required.
kubectl apply --validate=false -f https://github.com/jetstack/cert-manager/releases/download/v1.0.4/cert-manager.crds.yaml
kubectl create namespace cert-manager
helm repo add jetstack https://charts.jetstack.io
helm repo update
helm install \
  cert-manager jetstack/cert-manager \
  --namespace cert-manager \
  --version v1.0.4
Wait until cert-manager pods are in a Running state.
kubectl get pods -n cert-managerNAME READY STATUS RESTARTS AGE
cert-manager-75dbbd5d6-4pd5j 1/1 Running 0 5m
cert-manager-cainjector-85c559fd6c-mvwnt 1/1 Running 0 5m
cert-manager-webhook-6c77dfbdb8-dkvx2 1/1 Running 0 5mInstall Rancher
You should update the command from the documentation to your likes.
helm upgrade --install rancher rancher-stable/rancher \
  --namespace cattle-system \
  --set hostname=rancher.example.com \
  --set replicas=1 \
  --set proxy="http://proxy.example.com:80/" \
  --set noProxy=".example.com\,169.254.169.254\,10.0.0.0/24"
Then, validate if all resources are created.
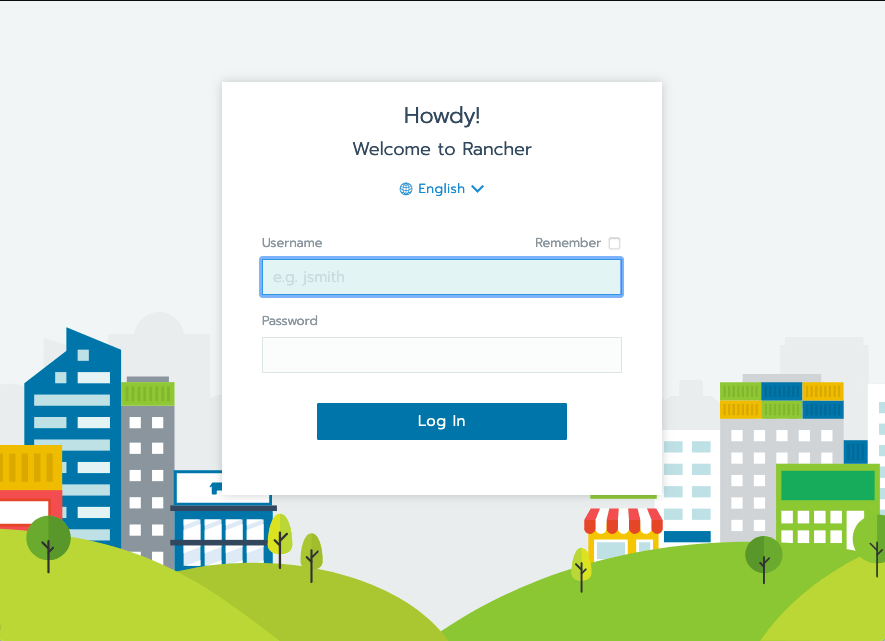
kubectl get pods -AIf all goes well, your fancy dashboard will be available at https://rancher.example.com.
And that’s how you install Rancher RKE2 on CentOS Stream 8! If you have any questions, we’re here to help. Leave us a comment below or contact us here and we’ll get back to you ASAP. And if you’re interested in Kubernetes services, check out what we can do for you!