Billing and Invoicing with Jira add-on Tempo Timesheets
Atlassian offers great ways to resolve the need many companies have for billing and invoicing. The Atlassian Marketplace showcases numerous add-ons that integrate with Jira to help with that need. These add-ons can be extremely powerful, for example ending the need to compile numerous Excel sheets or gather paper files to invoice a client.
Tempo Timesheets is an award-winning time-tracking add-on for Jira that benefits customers with real-time and accurate invoicing functions. In this guest blog post by Tempo’s Maxime-Samuel Nie-Rouquette, we track Paul’s steps to invoice a new client through Tempo Timesheets and the best practices that Paul applies to maximize the benefits he reaps from the add-on.
Quick introduction
Paul takes care of sending invoices to clients for his team’s R&D efforts. Before using Tempo Timesheets, Paul was using the honor system to calculate the total compensation. The honor system created numerous problems with clients due to the lack of accuracy and transparency, and was quickly dropped for a more practical solution.
Step 1 – Adding a Customer
Paul’s new client, Soylent Corp, has signed an agreement with Paul’s company to create a new product, Soylent Green. Whenever a new customer comes around, Paul’s first step is to create a new customer in order to have an organized report throughout the progression of a project. Paul starts the invoicing process by creating a customer account so that he will be able to analyze the time his team spends on billable and non-billable issues for that particular customer.
The ‘Accounts’ tab is a functionality unique to Tempo Timesheets and is very powerful. In essence, it allows you to improve the reliability, transparency, and accuracy of time tracked for clients across multiple projects and teams. Any new projects from a client can easily be added to their account.
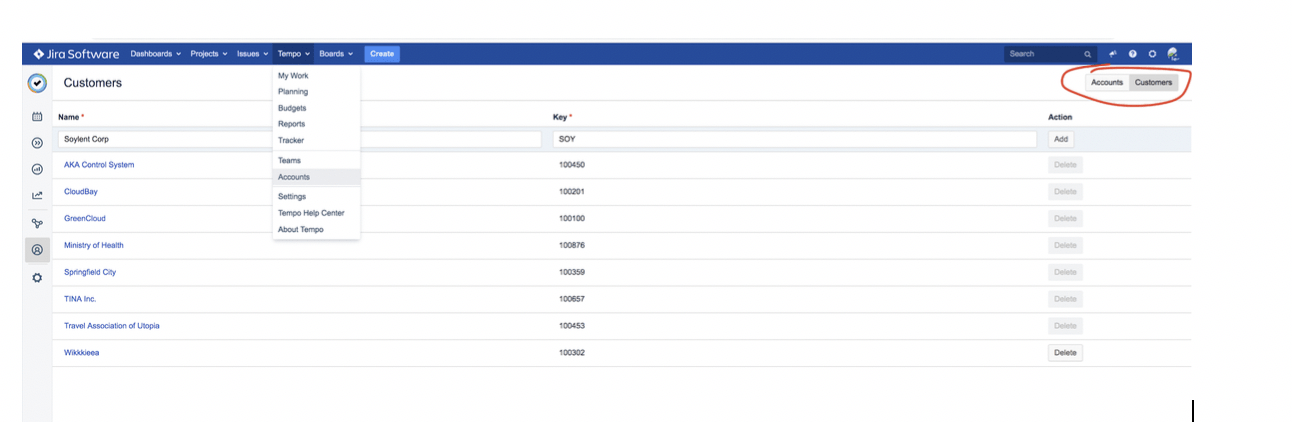
To create a customer account for Soylent Corp, Paul navigates to the ‘Accounts’ page from the Tempo Timesheets menu at the top of the page. In the upper-right corner of the screen, the ‘Customer’ tab is where new customers are added. In this case, Paul adds Soylent Corp in the ‘Name’ field and SOY in the ‘Key’ field.
Step 2 – Creating Account Categories & Accounts
In order to fully benefit from the accounts, Paul needs to create account categories. These categories enable Tempo Timesheets to identify if the time spent is billable or non-billable, and are used in conjunction with accounts to properly showcase and organize data in reports.
The first account category Paul creates is “RND”, for research and development, which Paul’s team identifies as billable work. For example, if the team works on a mathematical model to search for the best nutrients for Soylent Green, they would track the activity as billable as it falls into “RND”.
Paul also creates “TRN”, for training, which is classified as non-billable work by Paul’s company. In the event that new members are added to the team and need to be worked in, the training time would be deemed non-billable as it would fall under “TRN”.
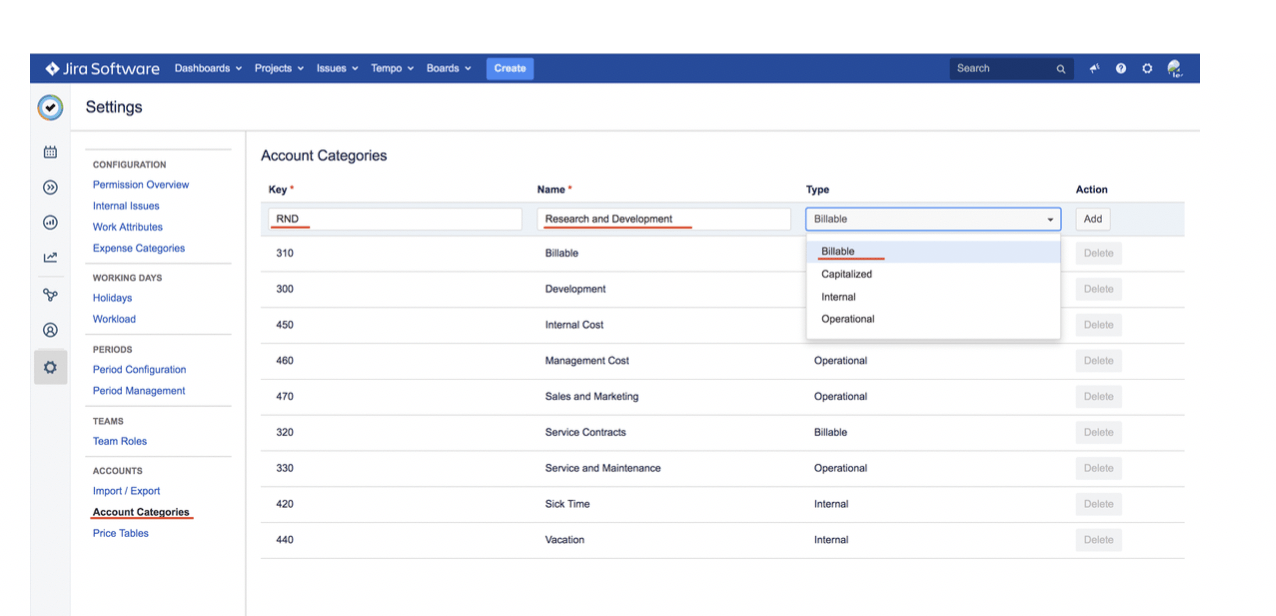
To access and add new account categories, Paul navigates clicks the ‘Account Categories’ tab found under the ‘Accounts’ section of the settings menu. In this case, Paul adds ‘RND’ as the key, ‘Research and Development’ as the name, and classifies it as a Billable type. For ‘Training’, Paul repeats the process, but adds ‘internal’ as the type.
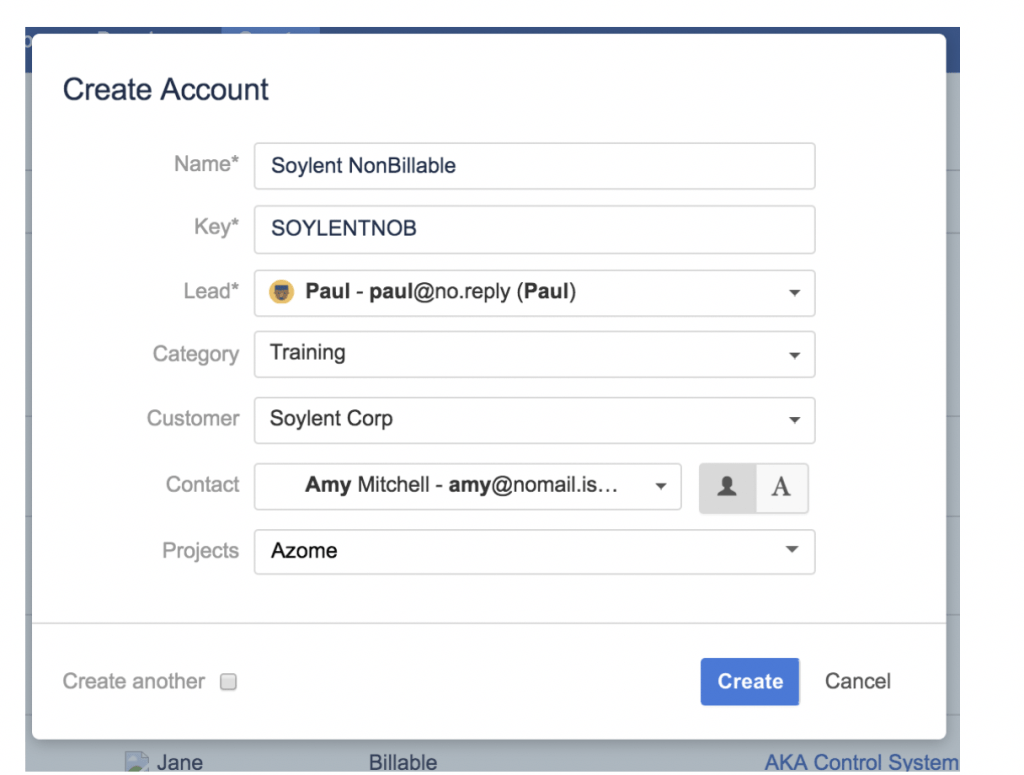
With the two account categories now created (RND and TRN), it’s best practice to create accounts so that the time is rightfully associated and the data is accurate during the reporting/invoicing process. Previously, Paul created account categories to help the system categorise the type/nature of the activities. Now Paul includes that information in the Account so it’s easy to understand the nature of the work, who it is for, which projects are included in the account, and so on. Because Paul created 2 account categories (one billable and one non-billable), he does the same for the accounts: one billable and one non-billable. As such, the accounts have the following information:
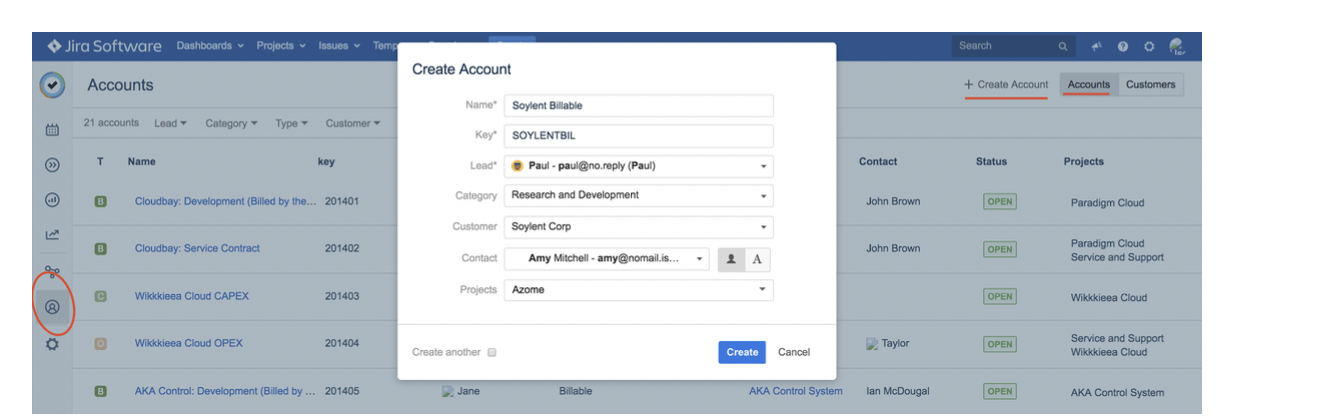
Going back to the account page, Paul adds the two accounts by clicking the create account button at the top right section of the page. When the account window appears all that is left to do is to fill in the right information:
- Name + Key: Name and tag for the account (Soylent Billable +SOYLENTBIL)
- Lead: Key person for the account (Paul)
- Category: the account category for this (Research and Development)
- Customer: name of the customer (Soylent Corp)
- Contact: Key Contact at the Customer’s Company (Amy)
- Projects: Collects all issues where there is billable logged time (Azome)
Paul repeats the process for the non-billable account:
Paul has now successfully created the necessary foundation for Paul’s team to have their logged time show under the right categories and fields – in real-time!
Step 3 - Logging time
Now that the foundation has been laid, Paul and his team need to log their time in order to offer the transparency and accuracy that they seek to offer.
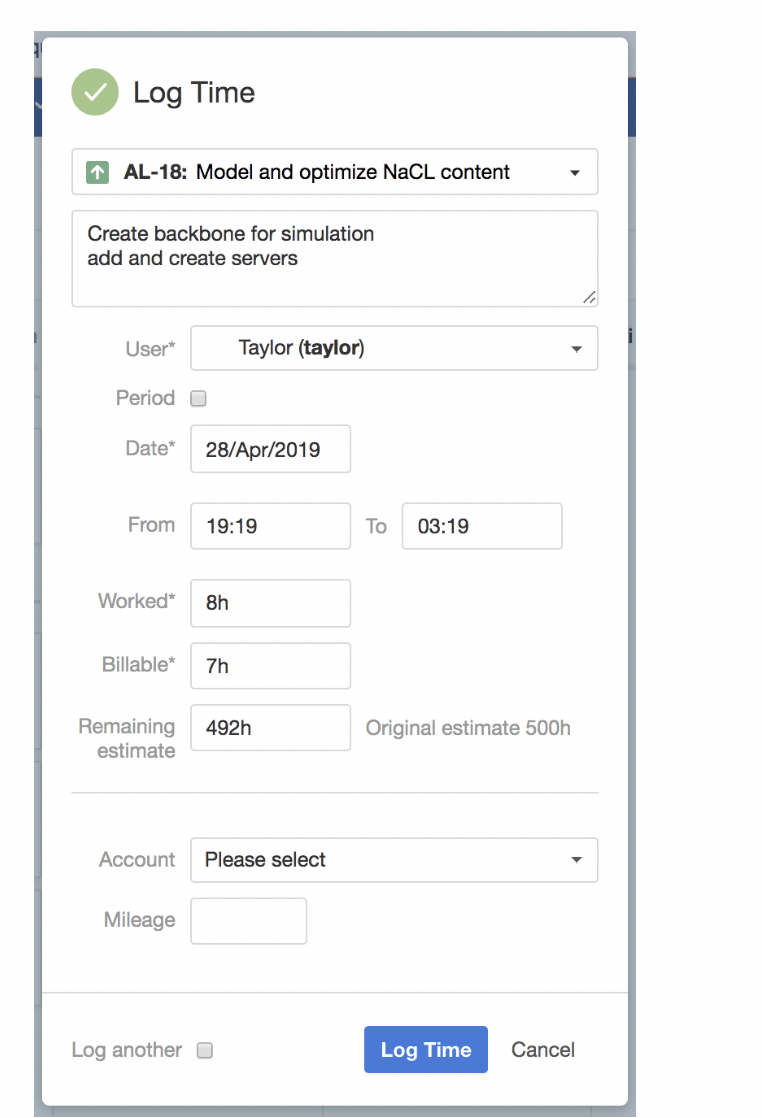
There are multiple ways to track time and have that time be associated with billable and non-billable time for a customer/project. It all depends on the way a company is set-up to operate and track time. In this case we simply modified the ‘billable’ and ‘non-billable’ hours in the worklog window. For Paul’s company, everyone is able to track billable and non-billable hours. For example, Taylor worked 8h today on a modelization task, but deemed that only 7h were billable, because she was doing 1h of relevant menial tasks that she deemed non-billable.
The biggest challenge that Paul now faces is to have his team accurately and consistently track and log their time. Here are some best practices.
- Paul could ask his system admin to approve timesheets on a monthly frequency, as a way to ‘force’ the team to correctly track time.
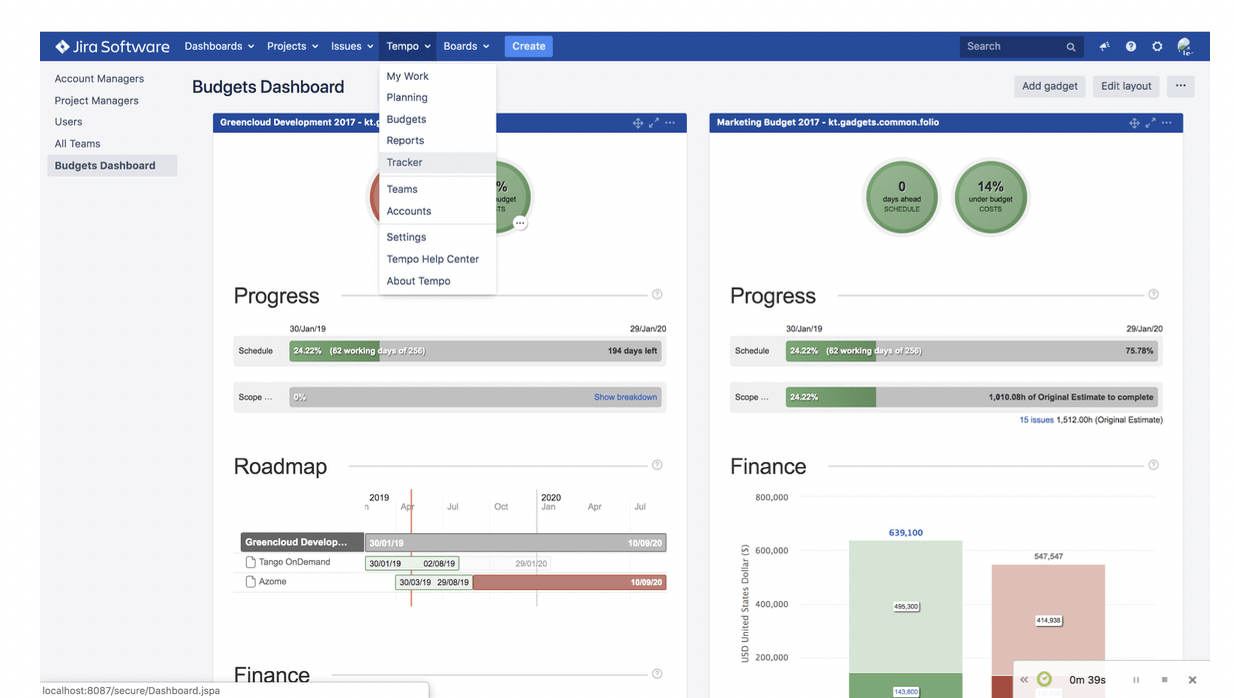
- The team can use the real-time tracker found in the Tempo submenu (‘Tracker’). Using this method, users can simply pause the timer of the tracker when they get interrupted during the day (calls, unplanned meetings, breaks, etc.), or stop the timer to prompt the worklog window to automatically appear with the time already filled in.
- Paul’s team can also open the worklog dialog using the associated window hotkey. When the hotkey is pressed anywhere in Jira, the worklog window will appear to let the user log their time. This is convenient for users if they want to quickly log their time once they’re done working on something.
Step 4 – Creating the custom report for the customer’s invoice
Once the project is complete or when it is time to showcase some progress, Paul can easily create a report. A report displays the time spent on issues, both billable and non-billable, and updates all that information in real-time.
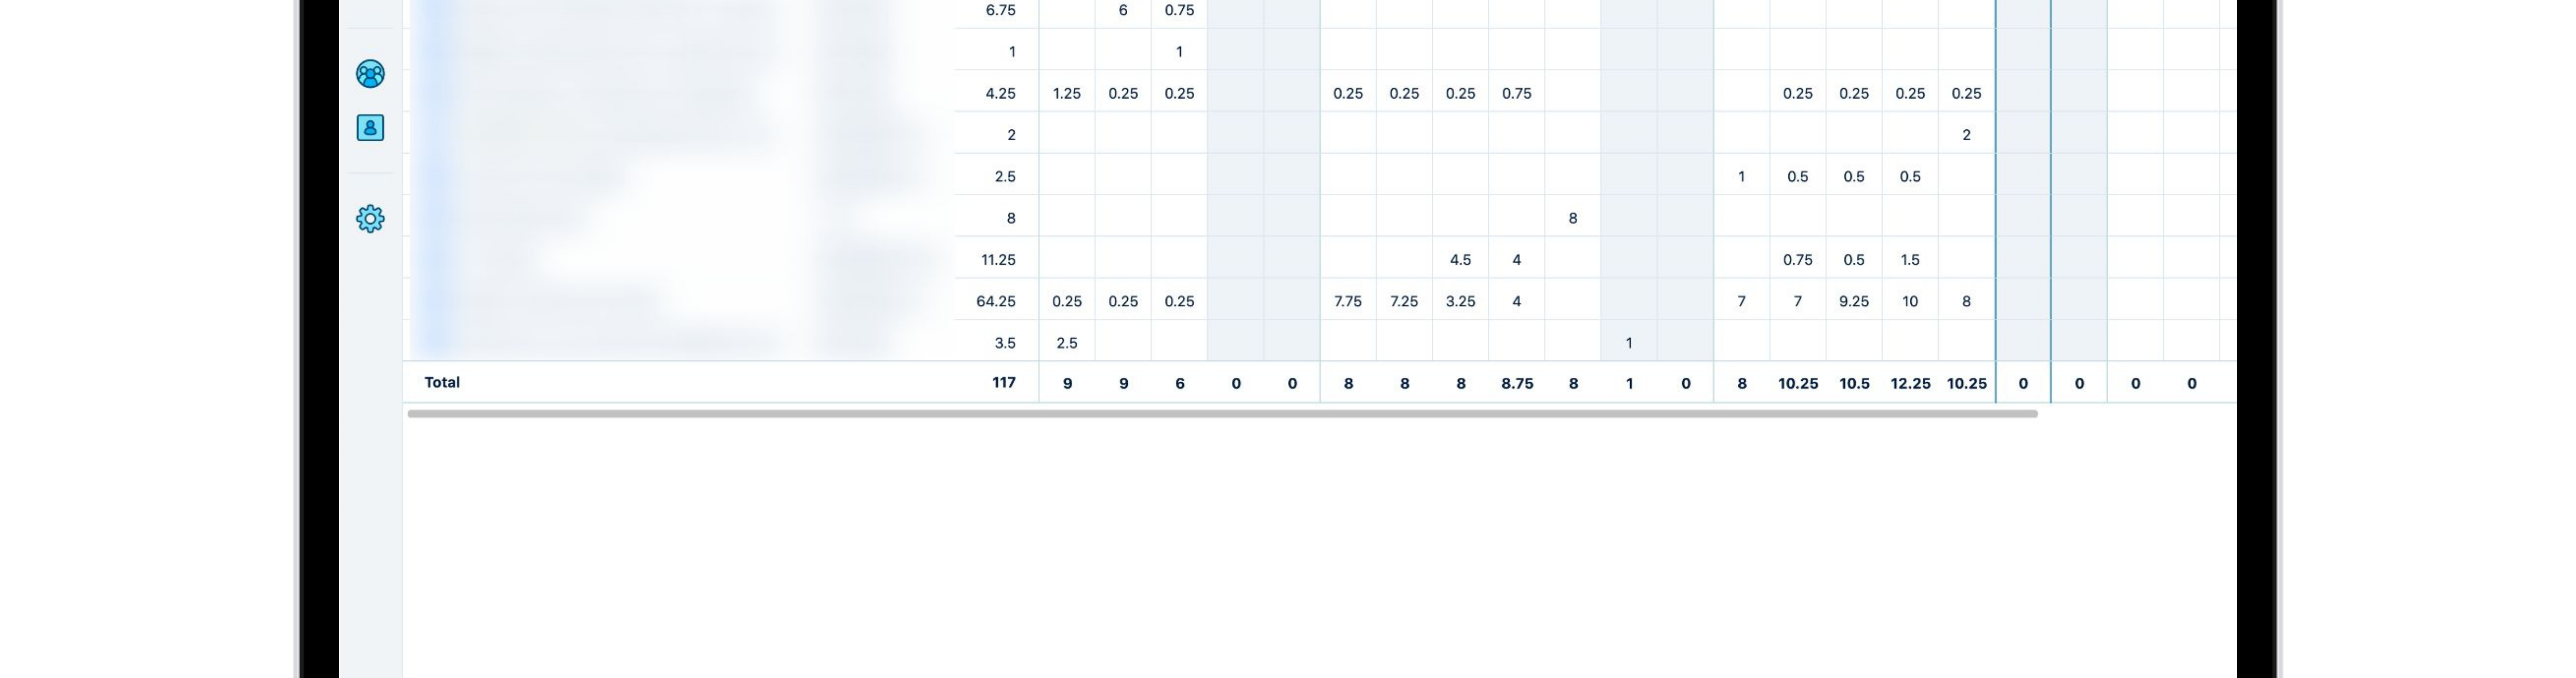
It’s been a month since the start of the project and Soylent Corp is requesting their monthly invoice, which also doubles as a report. Paul’s team spent 291 hours this month working on the project, but only 237 hours are billable. Paul might still want to show this metric to Soylent Corp to show that the team has been spending time behind the scenes to better serve the client. Through the custom report, Paul can now have a breakdown of the hours his team worked for Soylent Corp this month.
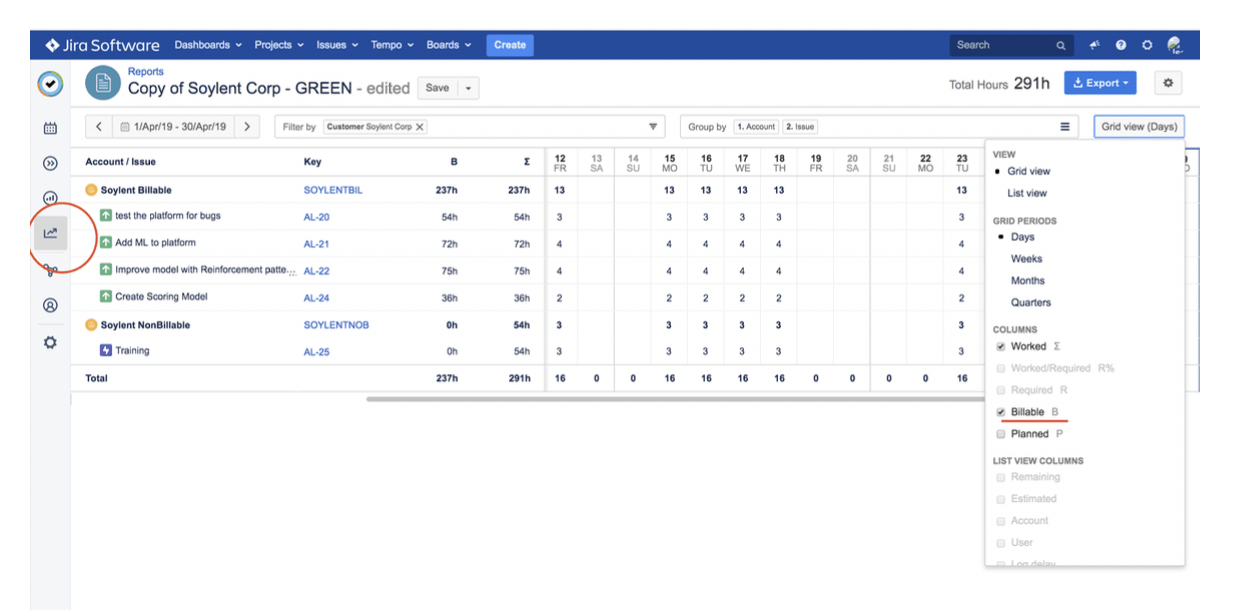
Paul can create a custom report either from the Tempo submenu at the top of the page or via the icon on the left side of the page. In this case, he only wants to display the information for the month of April relevant for Soylent Corp and easily filters by Soylent Corp. Because Paul is interested in showing both the billable and non-billable tasks worked on this month, he groups by Account + Issues. Finally, to have an understanding of the breakdown of billable and non-billable time and the total sum for each, Paul adds the billable column (found in the grid view).
🚀 Takeaway
Paul was able to create the foundation and promote some practices to his team so that he would easily be able to provide his client with accurate and transparent information at the click of a button. Unsurprisingly, this method is vastly superior to the honour system as it works within Jira, so it is also very convenient for his team to track the time (as it is the same environment they work with on a daily basis). In the end, there is great value for Paul and his company in the time that is being saved internally as a result of tracking time consistently.
The steps above offer a very simple way of setting up Tempo Timesheets to create some invoices. However, every company has their own unique ways of operating and tracking time, so the method explored today might not be sufficient for the needs of your company. If you’d like to better understand how this could fit with your internal methodology, we recommend visiting Tempo.io or connecting with our customer support so that they can provide their guidance to optimize your business practice with Tempo Timesheets.
About Tempo timesheets
Tempo Timesheets is a time-tracking and reporting solution that seamlessly integrates with Jira to help teams and managers track time for accounting, payroll, client billing, compliance, enhanced efficiency, and forecasting.
Core features include:
› Painless time tracking. Timesheets offers a better overview of work time for billing, measuring costs, internal time, and work performed.
› Flexible reporting. Drill down on estimated versus actual time spent on JIRA issues, billable time, and more.
› Cost center management. Gain better visibility of all activities and work performed for customers, internal projects, and development.
Thank you to Maxime-Samuel Nie-Rouquette from Tempo for writing this guest blog post!
At ACA, we also use Tempo Timesheets for our billing and invoicing, and are a Silver Partner as well. We’ve developed our own add-on to Tempo Timesheets that allows users to customize their Tempo work log fields, add custom Javascript to Jira and adapt Jira’s style and behaviour.