
How to Install Istio Service Mesh: A Comprehensive Step-by-Step Guide
Istio is one of the most well-known Service Mesh tools, acting as a proxy between services. Istio Service Mesh allows for easy management, monitoring, securing, and scaling of communication between services, all without the need to implement these functionalities in the application code. In this article, we provide a step-by-step guide on how to install Istio Service Mesh. We also showcase various examples of Istio Service Mesh in action.
In our first blog article, “Istio Service Mesh: What and why”, we explained what Istio Service Mesh is and its advantages. In this article, we delve into more detail, demonstrating how to implement and apply Istio in practical scenarios.
Installing Istio via istioctl: Step by Step
There are two officially supported methods for Istio installation:
- Via istioctl
- Using Helm charts
In this article, we will focus on the first method.
STEP 1: Preparation and Documentation
Before delving into the installation process, it is crucial to consult the official documentation. Also, check the compatibility matrix to verify which version of Istio is compatible with your Kubernetes version.
Using the istioctl tool, we will apply a configuration file to the cluster. This configuration file ensures that the necessary components are installed:
- An ingress gateway that will handle incoming traffic
- An egress gateway that will handle outgoing traffic
- Istiod control plane, responsible for handling certificates, and other tasks
- An istio-proxy sidecar container added to each pod running in the cluster.
STEP 2: Downloading and Installing istioctl
You can install istioctl by executing the following one-liner. This will download the latest version for your architecture:
curl -L https://istio.io/downloadIstio | sh -
Alternatively, you can install a specific version by providing certain environment variables:
curl -L https://istio.io/downloadIstio | ISTIO_VERSION=1.20.1 TARGET_ARCH=x86_64 sh -
STEP 3: Creating IstioOperator.yaml File
Simplifying the setup for creating an IstioOperator.yaml file with information about the desired Service Mesh configuration could be achieved as follows:
apiVersion: install.istio.io/v1alpha1
kind: IstioOperator
metadata:
  finalizers:
    - istio-finalizer.install.istio.io
  name: istio-controlplane
  namespace: istio-system
spec:
  components:
    base:
      enabled: true
    egressGateways:
      - enabled: true
        name: istio-egressgateway
        namespace: istio-system
        k8s:
          replicaCount: 2
    ingressGateways:
      - enabled: true
        name: istio-ingressgateway
        namespace: istio-system
        k8s:
          replicaCount: 2
    pilot:
      enabled: true
  profile: default
  values:
    global:
      proxy:
        resources:
          limits:
            memory: 100Mi
          requests:
            memory: 100Mi
    pilot:
      replicaCount: 2
This YAML file describes the configuration of the following components:
- 2x istio-ingressgateway container
- 2x istio-egressgateway container
2x istiod container (the old name 'pilot' is used in the YAML file)
- For proxy sidecars, we set a memory limit of 100Mi, which will run as an additional container in your application pods.
STEP 4: Applying Configuration with Upgrade Capability
To apply the above configuration, execute the following command:
~/istio-1.20.1/bin/istioctl install --set revision=1-20-1 -f IstioOperator.yaml
We add a revision to our installation command to install a newer version of Istio alongside the existing version. Once deployed and validated, we can fully switch to the new version. This is a crucial step to enable upgrades without downtime.
It's important to note that we can execute the installation command multiple times. Even for minor changes, we will use this command because Istioctl employs the "reconciliation" method. The specified configuration in the IstioOperator.yaml file is compared with the current state on the cluster, and only the necessary changes to achieve the described situation are executed.
After running the installation command, the following PODs will be added to the cluster:
NAME READY STATUS RESTARTS
istio-egressgateway-f66c5597-9t9g8 1/1 Running 0
istio-egressgateway-f66c5597-p4nsq 1/1 Running 0
istio-ingressgateway-58bcd84f68-fqxhz 1/1 Running 0
istio-ingressgateway-58bcd84f68-sdqjv 1/1 Running 0
istiod-1-20-1-5558b9b4f6-p8kw7 1/1 Running 0
istiod-1-20-1-5558b9b4f6-pchdv 1/1 Running 0
STEP 5: Adding Sidecar Containers to PODs
After installing istiod, ingress-gateway, and egress-gateway, it's essential to ensure that the proxy sidecar containers are added to our application PODs. Firstly, we need to configure "istio-injection" by adding a label to the namespace where the application is running.
apiVersion: v1
kind: Namespace
metadata:
  name: maildev
  labels:
    istio-injection: enabled
Next, we can perform a rolling restart of the application. This will cause each container to restart with a sidecar container.
Note that 2 out of 2 containers are ready:
NAME READY STATUS RESTARTS
maildev-544f69466b-lp4hg 2/2 Running 0
The above process needs to be performed for each application.
The Complete Installation
The complete installation flow can be represented as follows:
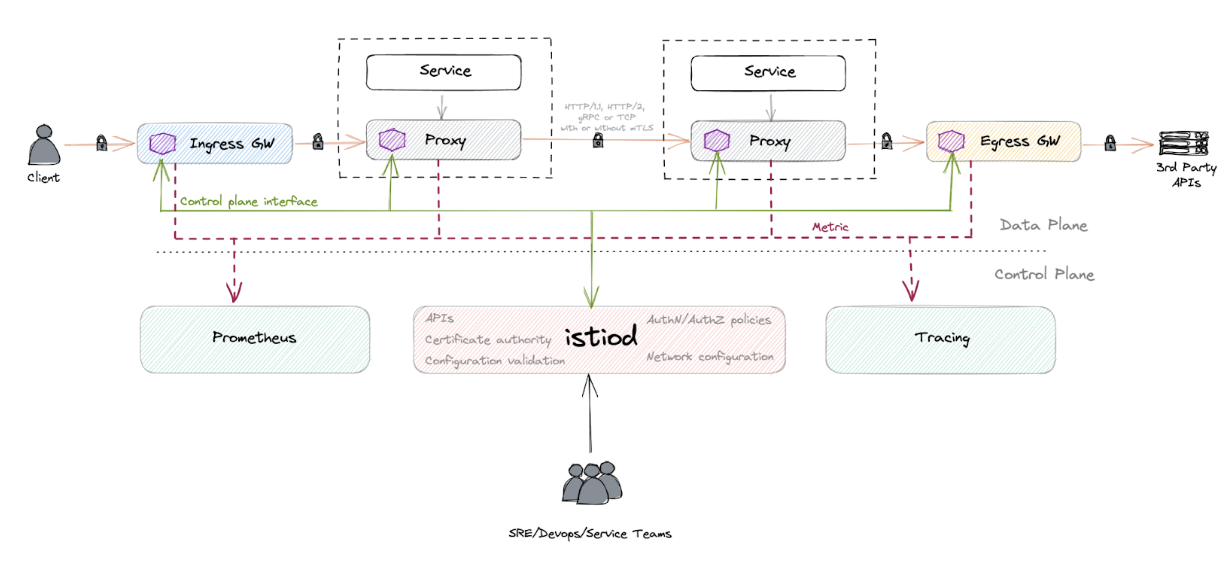
The complete installation flow follows these steps:
- Traffic enters the ingress gateway.
- The ingress gateway forwards traffic to the proxy of application 1.
- Traffic passes through the proxy of application 2.
- Traffic goes out through an egress gateway.
Note that both the ingress gateway, the proxy sidecar containers, and the egress gateway utilise an Envoy proxy. All communication occurs via mutual SSL, automatically configured once the sidecar containers are added. The istiod application has a certificate authority that automatically generates certificates to encrypt traffic between the various Envoy proxies. Encrypting traffic is a key reason for choosing Istio Service Mesh.
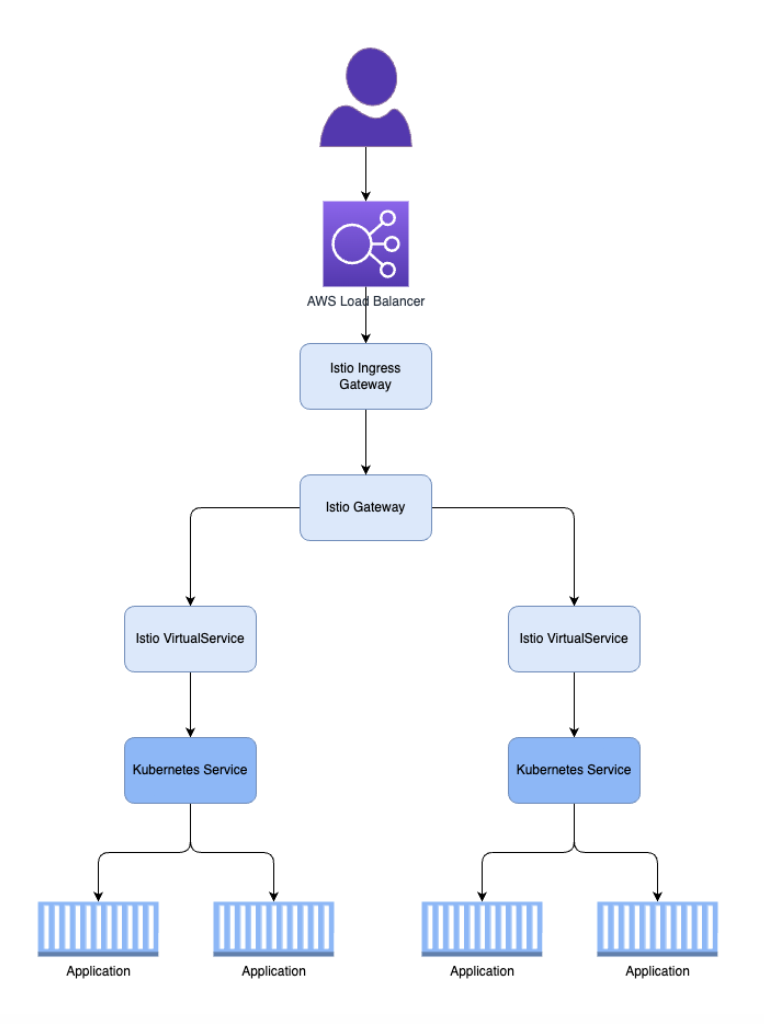
Getting Traffic to Our Application
Now that we have Istio Service Mesh operational, our initial goal is to route traffic through the ingress gateway to our applications. In this case, we do not use the standard 'Ingress' resource that Kubernetes provides by default. Istio adds some capabilities in traffic management that cannot be achieved with a standard Ingress object. Therefore, Istio delivers its own Custom Resources.
In this scenario, we will use a Gateway and a VirtualService object. When these resources are added to the cluster, the Envoy proxy configuration is generated based on the provided configuration. This configuration ensures that traffic to the application is possible. Initially, we create a Gateway object.
apiVersion: networking.istio.io/v1alpha3
kind: Gateway
metadata:
  name: default-gateway
  namespace: istio-system
spec:
  selector:
    istio: ingressgateway
  servers:
    - port:
        number: 443
        name: https
        protocol: HTTPS
      hosts:
        - "*"
Next, we create a VirtualService:
apiVersion: networking.istio.io/v1alpha3
kind: VirtualService
metadata:
  name: maildev
  namespace: maildev
spec:
  hosts:
    - "maildev.example.com"
  gateways:
    - istio-system/default-gateway
  http:
    - match:
        - uri:
            prefix: /
      route:
        - destination:
            port:
              number: 80
            host: maildev
This refers to a maildev service, which will then point to the respective PODs.
The following diagram visually represents this:
Examples of Traffic Management with Istio
While we've successfully directed traffic to our application, Istio offers even more sophisticated scenarios for traffic management. I'd like to delve into some of these capabilities. You can find a comprehensive list in the official documentation: https://istio.io/latest/docs/tasks/traffic-management/
In the following examples, traffic is routed between different versions of an application. Before we can access these versions of the application, the necessary resources need to be created. A deployment and its corresponding service must be created, as described in the 'reviews' section at https://raw.githubusercontent.com/istio/istio/release-1.20/samples/bookinfo/platform/kube/bookinfo.yaml
Subsequently, DestinationRules need to be created for each version, as outlined in the 'reviews' section at https://raw.githubusercontent.com/istio/istio/release-1.20/samples/bookinfo/networking/destination-rule-all.yaml
Request Routing
With request routing, we divert a portion of the traffic to a different version of the application. In the example below, traffic is initially directed to 'reviews v1' by default. However, this changes if the 'end-user' header contains the value 'jason'; in that case, the traffic is routed to version 2. The concept of request routing can be valuable when implementing a new version of an application but wanting to thoroughly test it one last time before exposing it to the wider audience.
apiVersion: networking.istio.io/v1beta1
kind: VirtualService
...
spec:
  hosts:
  - reviews
  http:
  - match:
    - headers:
        end-user:
          exact: jason
    route:
    - destination:
        host: reviews
        subset: v2
  - route:
    - destination:
        host: reviews
        subset: v1
Traffic Shifting
In traffic shifting, we apply the principle of weighted routing. We will send a portion of the requests to version 1 and another portion to version 2. This can be useful for a gradual migration to a new version.
apiVersion: networking.istio.io/v1beta1
kind: VirtualService
...
spec:
  hosts:
  - reviews
  http:
  - route:
    - destination:
        host: reviews
        subset: v1
      weight: 50
    - destination:
        host: reviews
        subset: v2
      weight: 50
Fault Injection
In fault injection, we intentionally introduce errors, such as delays or error codes, to investigate how our configuration responds. This is useful for identifying misconfigurations, such as discrepancies in timeouts between load balancers, Envoy, and application-level timeouts, and also for pinpointing bottlenecks.
In the following example, we introduce a delay of 7 seconds for requests to version 1 of the application, but only for requests with the header 'end-user' and the value 'jason'. All other requests are unaffected by this configuration and are handled as usual.
apiVersion: networking.istio.io/v1beta1
kind: VirtualService
...
spec:
  hosts:
  - ratings
  http:
  - fault:
      delay:
        fixedDelay: 7s
        percentage:
          value: 100
    match:
    - headers:
        end-user:
          exact: jason
    route:
    - destination:
        host: ratings
        subset: v1
  - route:
    - destination:
        host: ratings
        subset: v1
Another possible error you can introduce is generating an error code by replacing the fault block from the previous example. This will cause the Envoy proxy to return an HTTP 500 error for requests with the 'end-user' header and the value 'jason'.
- fault:
      abort:
        httpStatus: 500
        percentage:
          value: 100
Security Policies with Istio
From a security perspective, Istio offers various configurations. Below, we cover some of them, but for more details, you can refer to: https://istio.io/latest/docs/tasks/security/.
Traffic Encryption within the Mesh
As mentioned earlier, istiod includes a certificate authority. Once Istio sidecars are added to the application PODs, the traffic between different applications becomes encrypted. An additional advantage is that everything related to encryption no longer needs to be handled by the application itself.
Authentication Policies
When identity verification is required before someone can log in, this process can be managed through Istio. Istio verifies whether the user has a valid JWT token to access the application. This is configured with a RequestAuthentication object and an adjustment in the VirtualService. The RequestAuthentication object activates JWT validation for our application.
apiVersion: security.istio.io/v1beta1
kind: RequestAuthentication
metadata:
  name: application-jwt-validation
  namespace: application
spec:
  selector:
    matchLabels:
      app: application
  jwtRules:
    - issuer: "https://customer-prd.eu.auth0.com/"
      jwksUri: "https://customer-prd.eu.auth0.com/.well-known/jwks.json"
      forwardOriginalToken: true
Next, we configure our application so that the user has access only when the claim contains a specific value.
apiVersion: networking.istio.io/v1beta1
kind: VirtualService
metadata:
  name: application
  namespace: application
spec:
...
  http:
  - match:
    - uri:
        prefix: /v1/
      headers:
        "@request.auth.claims.groups":
          exact: application-users
    route:
    - destination:
        port:
          number: 80
        host: application
EOF
Note that the authentication configuration no longer needs to be directly set up in the application; it is now handled by Istio. This results in less complexity in the application setup and greater consistency in handling authentication for different applications within the cluster.
Authorization Policies
With Authorization Policies, we have the ability to manage access to the application. A simple example is denying access to a specific path for everyone. For instance, you might have a particular endpoint that should not be accessible from the outside but should be internally accessible for specific actions.
apiVersion: security.istio.io/v1beta1
kind: AuthorizationPolicy
metadata:
  name: application-deny-elasticsearch-clear
  namespace: application
spec:
  selector:
    matchLabels:
      app: application
  action: DENY
  rules:
    - to:
        - operation:
            paths: ["/v1/services/elasticsearch/clear*"]
Other examples include:
- Denying access when a specific header is missing.
- Denying access based on the content of the obtained JWT token, for example, not a member of the 'admin' group.
- Allowing only certain HTTP methods on an endpoint, for example, allowing only GET and not POST.
Observability with Istio
The last significant feature we will discuss is observability. This involves collecting metrics and logs and applying distributed tracing. Here, we specifically focus on tracing; for information on other aspects, you can refer to the documentation: https://istio.io/latest/docs/tasks/observability/.
Distributed Tracing
Istio leverages the distributed tracing capabilities of Envoy to map the flow of traffic. This process works as follows:
- Traffic enters through the ingress gateway, which assigns a specific tracing header.
- When the traffic is forwarded to the application POD, the tracing header is included.
- If the traffic is forwarded again (for example, to Kafka), the same header is sent along.
As a result, the same header is known between the ingress gateway, the application, and Kafka. The tracing information between two objects, such as the ingress gateway and the application, is called a 'span'. Multiple spans, when they contain the same information in the header, can be combined into a 'trace'.
In this example, there is a trace that goes from the ingress gateway through the application to Kafka. The spans and traces can be visually displayed in tools such as Kiali and Jaeger. The screenshot below shows the visualisation of tracing in Kiali.
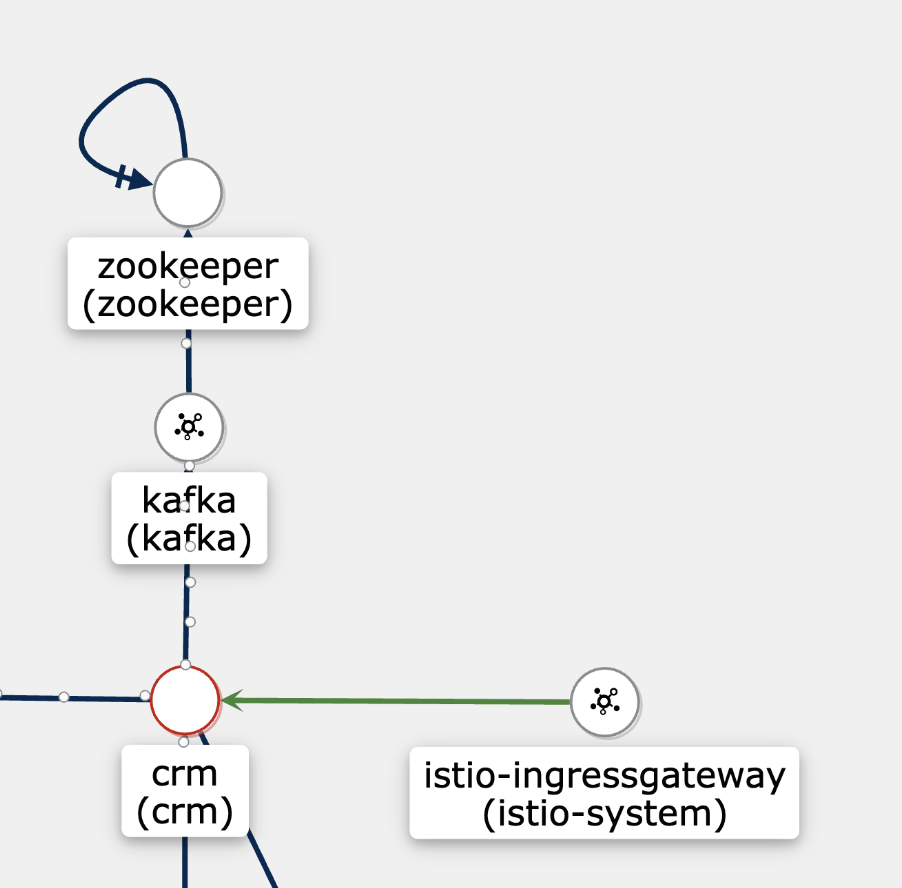
Based on tracing information, the following flow was automatically mapped:
- There is an application named CRM.
- Traffic flows between the ingress gateway and the CRM application.
- There is traffic between the CRM application and Kafka.
- Kafka uses Zookeeper for clustering.
- The multiple Zookeeper nodes in the cluster also communicate with each other.
This example illustrates how, with the help of distributed tracing, you can automatically gain insights into the applications and connections within the Service Mesh.
The Benefits of Istio Service Mesh
After discussing the features of Istio Service Mesh, we highlight the key advantages:
- Traffic Encryption: Traffic within the cluster is encrypted, and the necessary certificates are automatically managed by Istio.
- Uniformity and Simplification: Responsibilities such as login, authentication, and encryption are taken away from the application, resulting in a uniform and greatly simplified setup.
- Version Management: Routing rules allow the deployment of new versions of applications to a limited audience.
- Robust Testing: Testing capabilities like traffic shifting and fault injection contribute to robustness.
- Dynamic Overview: Distributed tracing provides an automatic and up-to-date overview of the entire stack.
More Information about Istio
If you want to learn more about Istio, consult the official Istio documentation or read the book 'Istio in Action', a technically in-depth yet clear presentation of Istio.
Want quick answers to all your questions about Istio Service Mesh?