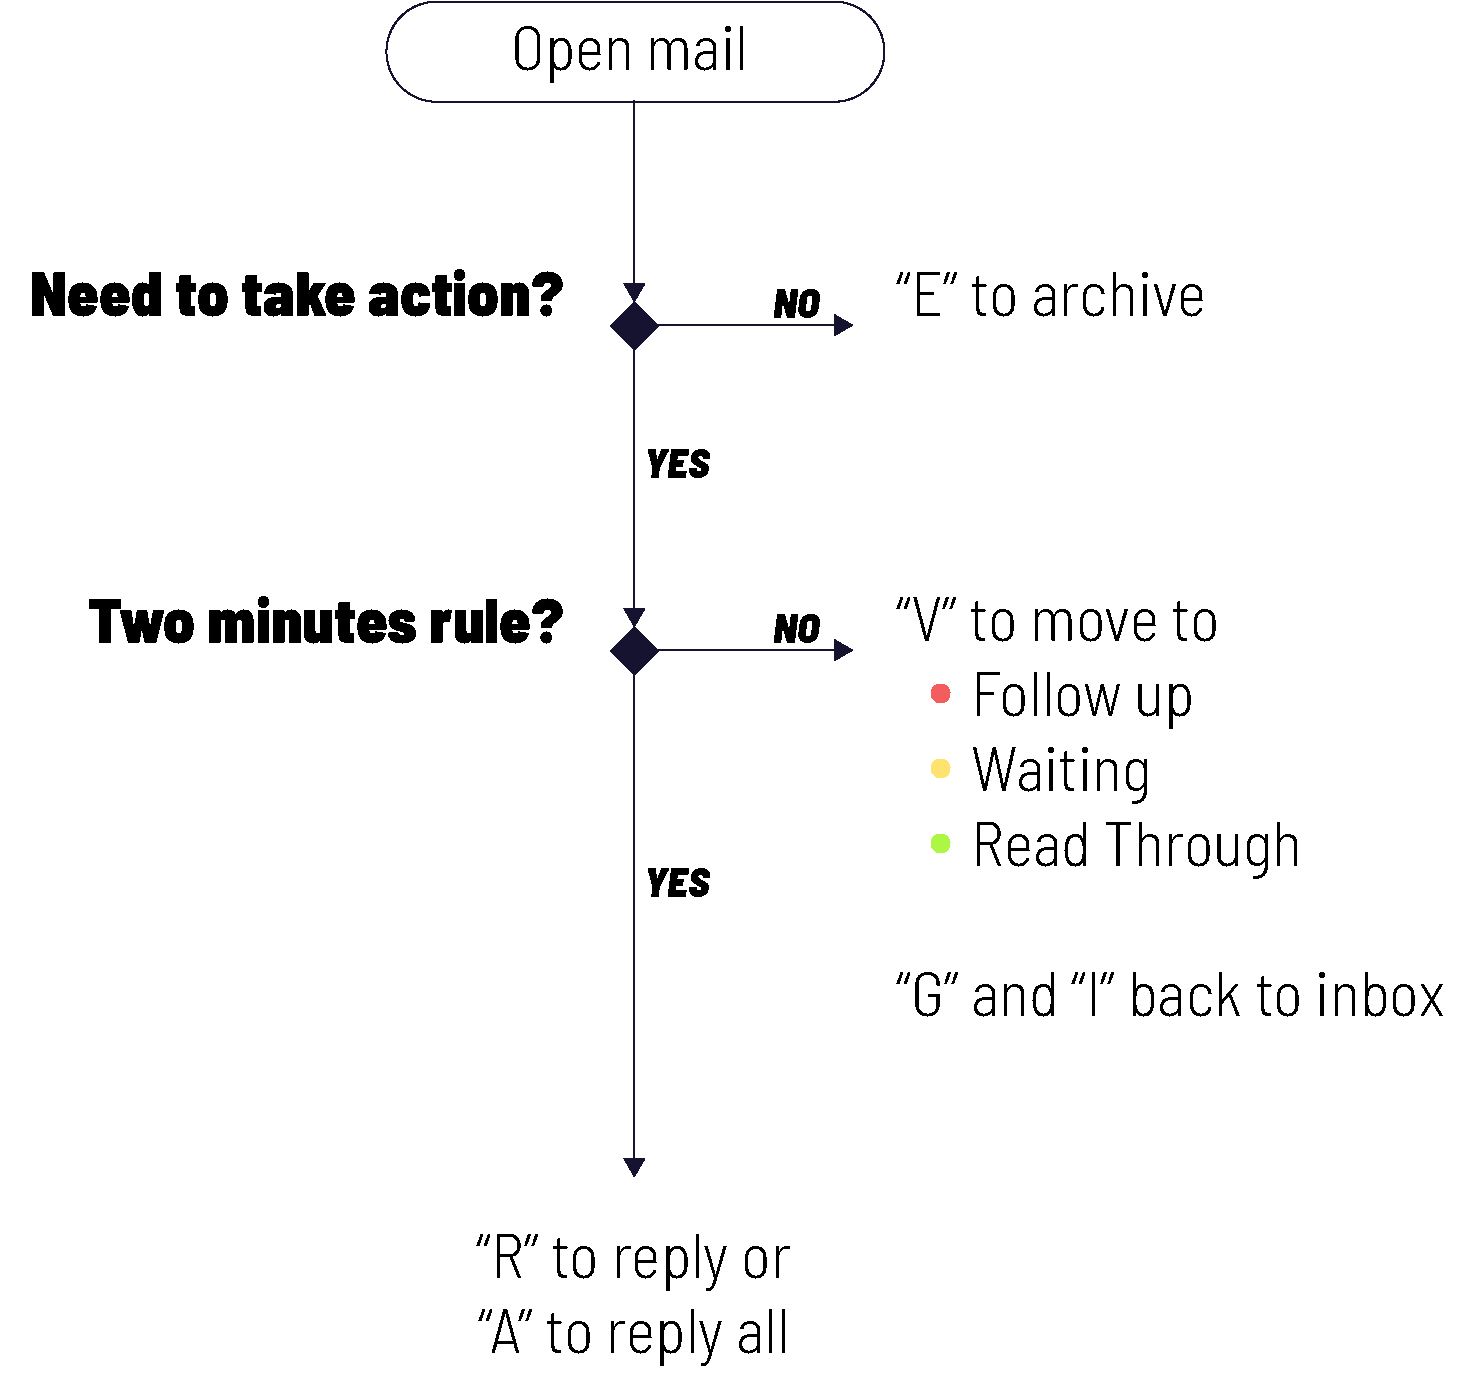
How to ‘inbox zero’ and be more productive
Inbox Zero is the goal of having zero emails in your inbox at all times. This blog post talks about achieving this and knowing when you are done decluttering your inbox for good. The idea is simple: spend less time managing your email and more time doing what matters most to you. It sounds great in theory, but it can feel impossible in practice when you have a hundred emails waiting for you.
Theoretically, we should be focusing on the unread emails that have come in since the last time we checked our inbox. But as human beings, our eyes are sometimes drawn to the red emails, the ones that we have already dealt with and should forget about, so we lose our focus and get distracted. A recent study has shown that it takes on average 64 seconds for us to get back on track. In other words, one of the main benefits of Inbox Zero is that as each new email arrives, you're not distracted by seeing a swirl of earlier messages. Not only will that distraction make you less productive, but it will also cause you to make more careless mistakes as well.
The entire Inbox Zero method centres on the idea that all emails received fall broadly into three categories.
- First, email that you need to take action on.
- Secondly, emails that require another party to take action on, but you're still responsible for the outcome. For example, someone owes you information for a report that you're writing.
- And thirdly, emails that you might want to read through again because they contain helpful information.
Although I'll be using Gmail for this blog, Inbox Zero works with most other email service providers like Outlook. Let’s get started!
Keyboard shortcuts
First, you want to go to your Gmail settings in the top right corner and click 'See all settings’. Then you want to go to the Advanced tab and enable ‘auto-advance’ and click ‘Save changes’.
You are redirected to the main screen. Let’s dive right back into ’See all settings’. And this time, you want to go to the General tab, go down to ‘auto-advance’, and make sure the next newer conversation option is selected here. And also, go down to keyboard shortcuts and ensure that the ‘Keyboard shortcuts’ radio button is selected. Click ‘Save changes’.
In order to view this content, you need to accept Marketing & third party cookies.
Click here to adjust your preferencesDefining Labels
Now, go back into our settings by clicking ‘See all settings’. And this time, go to the Labels tab and create four different labels.
- The first one is "Follow-up",
- The second is just "Waiting",
- For our third label, we’ll make one called "Read-Later",
- And finally, we’ll create a label "Calendar".
For the next step to work, make sure you follow along exactly as I have described above. Don’t worry if you want to customize more; you can always adjust labels later on.
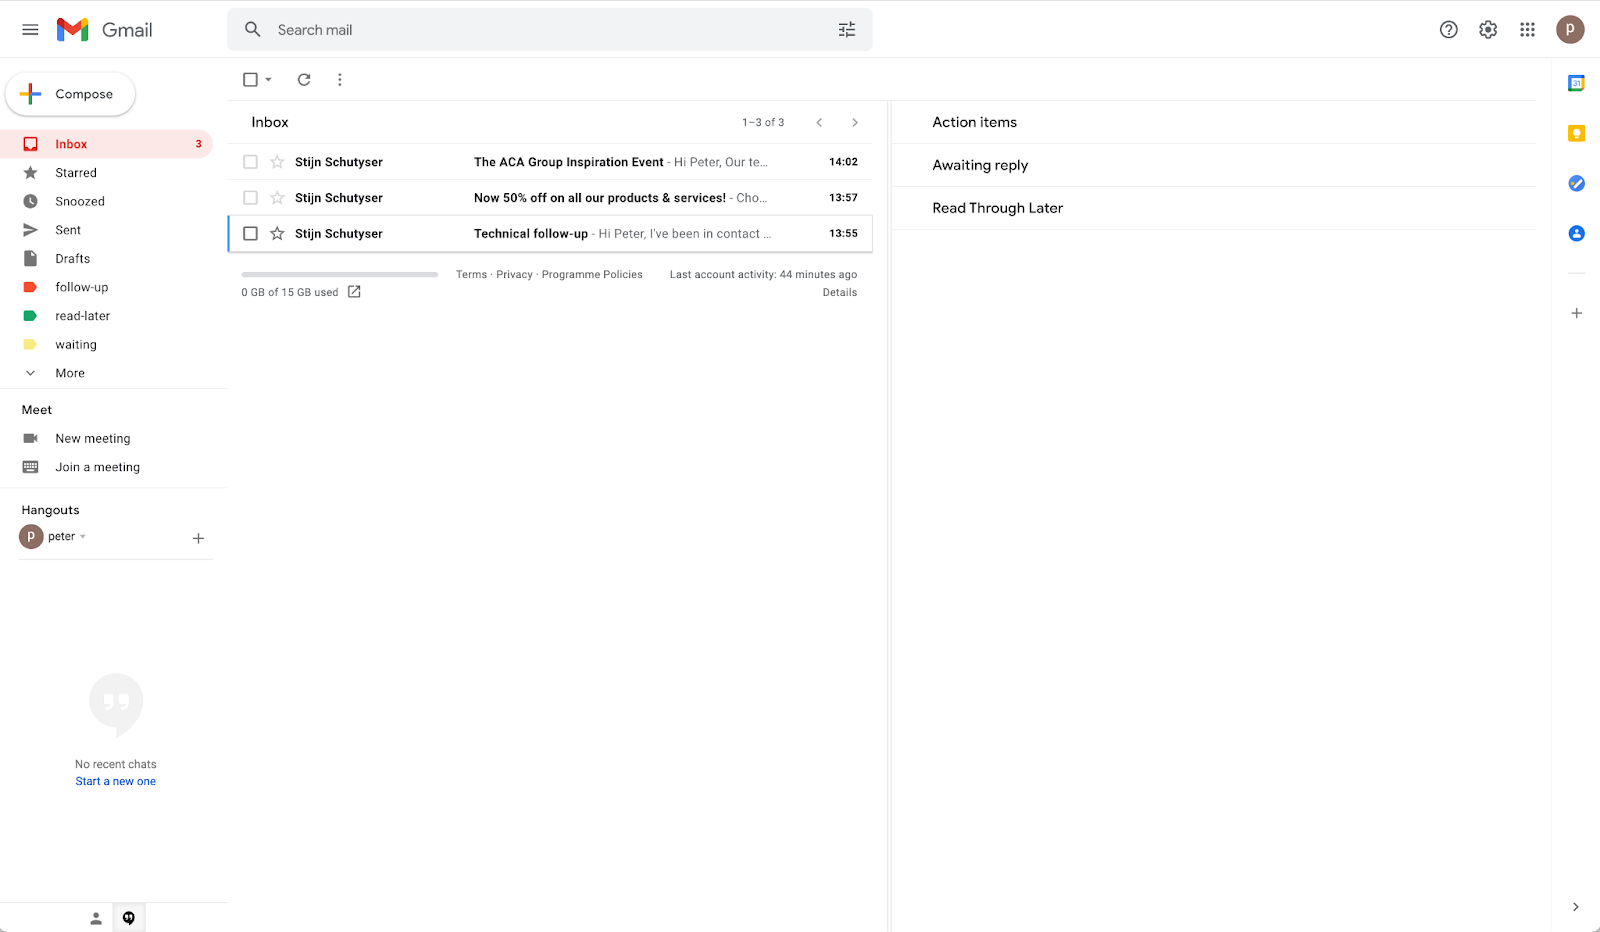
Using multiple inboxes
Now, go to the inbox tab. And instead of the default inbox, we change now to multiple inboxes. First for the section one search query, type in "l:follow-up", and the section name is "Action Items". Section two would be "l:waiting", and the section name would be "Awaiting Reply". Section three would be "l:read-later" and the section name is "Read Through Later".

As you’ve probably noticed, we’re going to save the calendar label for something later on. We'll get back to that. For now, though:
- the maximum page size is set to 10,
- put the multiple inbox position to the right of the inbox,
- deselect importance markers,
- don't override filters,
- and click Save Changes.
Once you've made those adjustments and saved all your changes, you should be brought back to your main inbox screen. Nothing crazy has happened so far. Three empty sections have popped up on the right-hand side here.
Applying labels
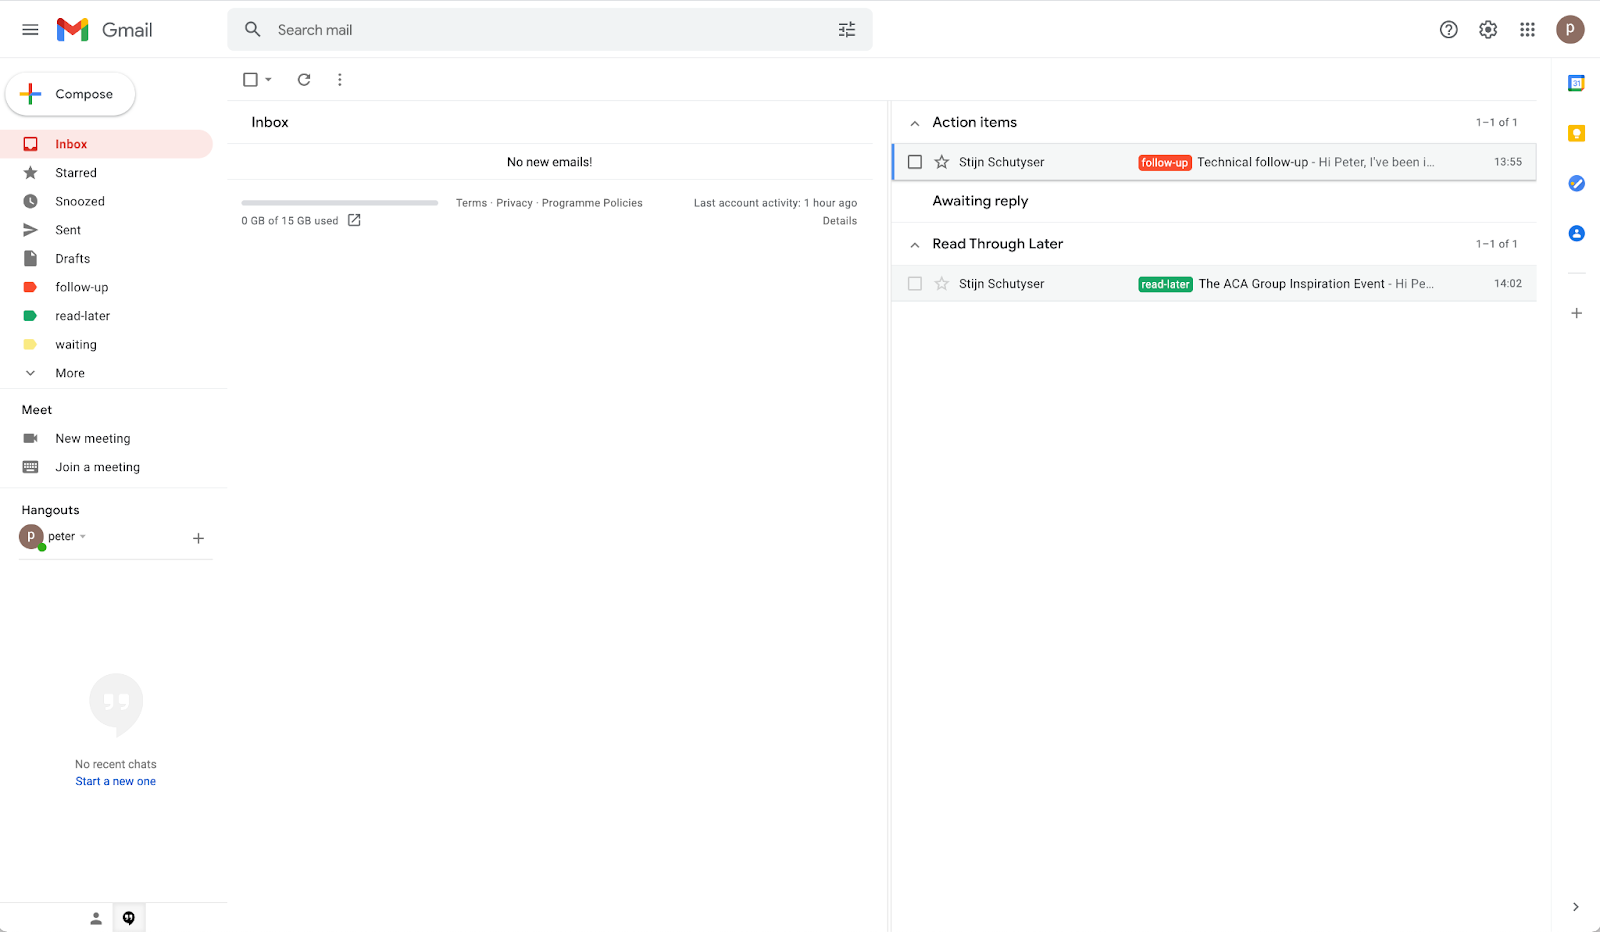
But here is where it gets exciting. So let's say at the beginning of a typical workday, the first thing I'll do is to go through my emails and sort them by their types, starting at the very bottom here.
The first email seems like an interesting one which I might want to refer back to later on.
So I first type "V" on my keyboard for label and start typing in "read later". And once the option comes up, press "Enter" to apply the "read later" label. Now, because we enabled the auto-advance feature, once we move the current email, we go to the next newer email down the list, which saves us a lot of time.
The next email seems to be an email where I don’t need to take action on. So I can archive it by pressing "E" straight away.
Another example is an email that has been sent to a vast email group that doesn't directly affect me. I can archive this directly. But here's a tip: you can press "M" to mute. This makes it possible that if other people reply-all to this email chain, you will not receive a notification unless it's sent to you directly. So I press "M" instead of "E" here, and it mutes and archives that email.
The next email requires action from my side. So I press "V" for label and start typing "follow-up". Press "enter" once the follow-up label pops up, and boom, I've applied the follow-up label to this email.
So this is how my inbox looks right now. The main inbox has zero emails, and all your action items and read-through emails have shifted to the right because you applied the labels and archived those emails.
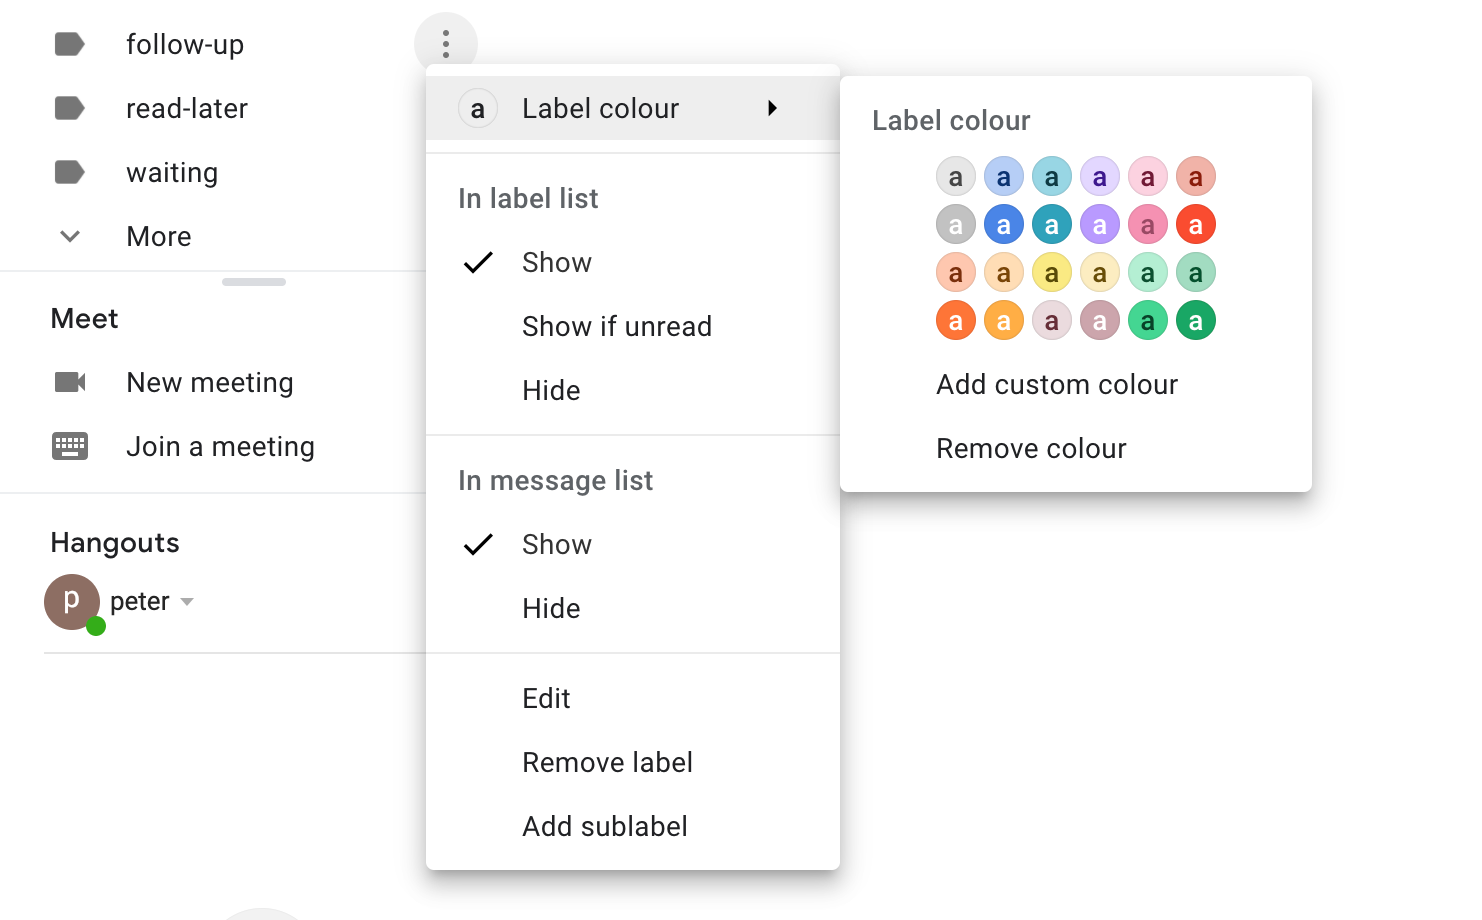
Color coding for more oversight
We can make this look a little more visually appealing by applying some color coding. If you click the "follow-up" label, I like to add the red color to this, green for "read later", and yellow for waiting. Of course, you’re free to choose your own colors for labels.
Another small tip here. If you go into any of these emails, let's say I just clicked on a big project one. And I want to go back to my main inbox screen without having to click the inbox tab here, and you can type in "G" and "I", which stands for go to inbox. And you'll be brought back to the main inbox screen with a refreshed inbox. So the idea here is that now your main inbox is clean. You can focus your attention on the follow-up action items you have already labelled and spend any free time going through the read-through emails.
Some of you might be wondering why the waiting inbox is still empty. In this inbox, we list the emails where someone else needs to take action, but you are still responsible for the outcome. For example, you're putting together a report and waiting for your colleague to send you some data. In that case, let's say you write an email asking for the data. You press "C" to compose the email and press "Command + Enter" to send it out. The more manual way to use the "waiting" label is to go to your sent email folder. Click the email you just sent. And you press "L" for label and start typing in "waiting". Click "enter", and you apply the waiting label, and you press "G" and "I". Afterwards, you're brought back to your main screen here. Wait a bit, and you'll see your sent email has now popped up in the awaiting reply inbox section. So this reminds you to chase the other person for that information they haven't gotten back to you in a few days.

Cleaning up calendar invites
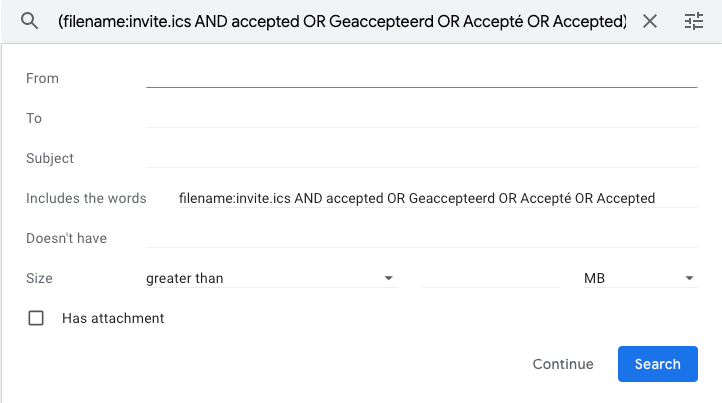
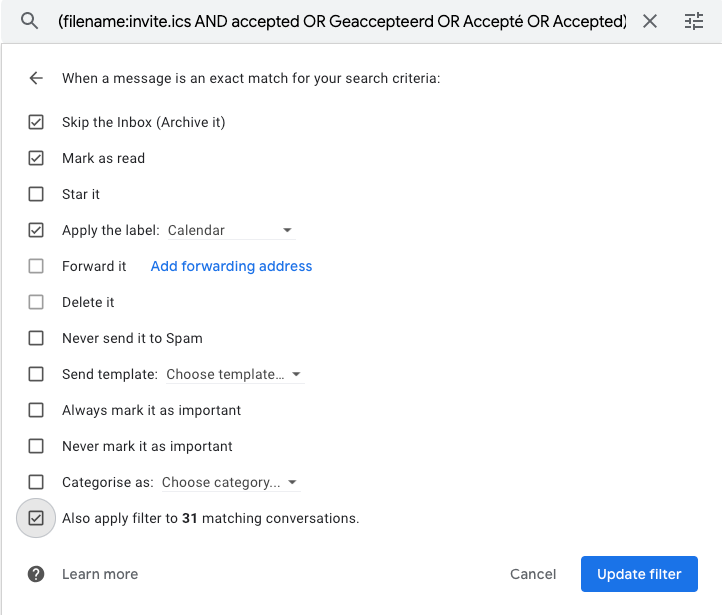
Another small hack that can make your life a lot easier involves calendar invites. So by default, if you send someone a calendar invite using Google Calendar, and they accept, you will always receive a notification saying the other person has accepted your calendar invite. If you think about it, there's no need for you to know if someone has accepted the invitation. You only need to know if someone has rejected your calendar invite so that you can reschedule. So there's a filter for that, you can create a filter with the following properties:
- In the "Includes the words" field, type in "filename:invite.ics AND accepted OR Geaccepteerd OR Accepté OR Accepted",
- Create the filter,
- Select skip the inbox and mark as read, apply the label Calendar
- Create filter.
Now, whenever you send an invitation out, that accept notification will by default be archived and skip your main inbox, so you don't have to see it.
Getting started with Inbox Zero
How can you apply all this to your inbox? You might have hundreds, if not thousands, of unarchived emails. So my advice is to go back three to four weeks and label your emails in the way I just described above. Then there comes a scary part. You want to select all your emails in your primary inbox, select all the conversations, and click archive. Don't worry because archive does not mean delete. It just simply means it's gone from your primary inbox. You can always find those emails again in your all mail folder.
Now that you have your inbox set up more efficiently, feel free to reach out if you have any questions. If you want help setting up and organizing a productive email system, I’m happy to assist!
For now, though, enjoy having a clean slate by using these techniques so next time when someone asks, "How do I get my Inbox zero?" just say, "I got it handled."
Workflow