
How to create fast scalable applications with VueJS and Firebase (part one)
Nowadays, loads of functionality that once got taken care of in the backend is shifting towards the frontend. As a frontend designer, I’ll show you how to create a simple SPA (Single Page Application) without the hassle of maintaining a backend.
What are we creating?
We will make a simple CRUD (Create, Read, Update, Delete) application in the form of a notes app. For this demo we are using: VueJS CLI, VueRouter, ElementUI and Google Firebase.
Please note that this is part one of a blogpost series. In this part we will set up Firebase, install VueJS locally via the command line interface, create the necessary views and set up the routing. Our database connection will be limited to ‘read’ only. Creating, updating and deleting notes via our app will be available soon in part two of the blogpost series.
Why VueJS?
There are many frameworks and technologies that may be suitable for this project, so choosing VueJS is a personal preference. I have chosen VueJS over other frameworks because:
- VueJS uses HTML templates, which makes it feel much more readable than for example JSX in React.
- Its learning curve is much more acceptable for frontend developers that lean more towards design than backend development, which is a great match for our creative team at ACA.
- Single file components (HTML/CSS/JS) and their great reusability.
- It comes with an integrated state manager (vuex) and router (vue-router) instead of relying on external libraries like for example redux.
- It’s lightweight and easily integratable in existing projects. Angular on its own is huge, and has a pretty steep learning curve. React’s approach just feels way too messy to me.
Then again, it also comes with some tradeoffs:
- It’s less adapted in the West. VueJS was created by Evan You, a former Google engineer. Evan has Chinese roots, and VueJS has a lot of market share in China. It may occur that you’ll come across some Chinese documentation if you are looking for third party addons.
- There aren’t as much VueJS jobs / developers available in Europe, although knowledge of the framework is getting more out there.
- It’s not backed / taken over by a multinational (yet), if you find that important. But it has a lot of Github contributions from a lot of people that simply love VueJS. It was the #1 most starred project on Github last year.
Why Firebase?
Firebase is a great service that lets you focus on what matters most: crafting fantastic user experiences. Using Firebase means you don’t need to manage servers or write APIs. Firebase can be your hosting, authentication tool, API and datastore. It can be modified to suit a lot of your needs and besides that, it can perfectly scale along with your project as it grows over time.
The ‘Spark’ plan, which is completely free, offers you up to 100 simultaneous connections, 1GB storage and a 10GB download limit. Enough for a small project, startups or for indie developers that want their idea(s) validated.
Creating the application
Depending on your skill level, the following steps will take you approximately 30 to 60 minutes to complete.
Step 1: Setting up our Firebase environment
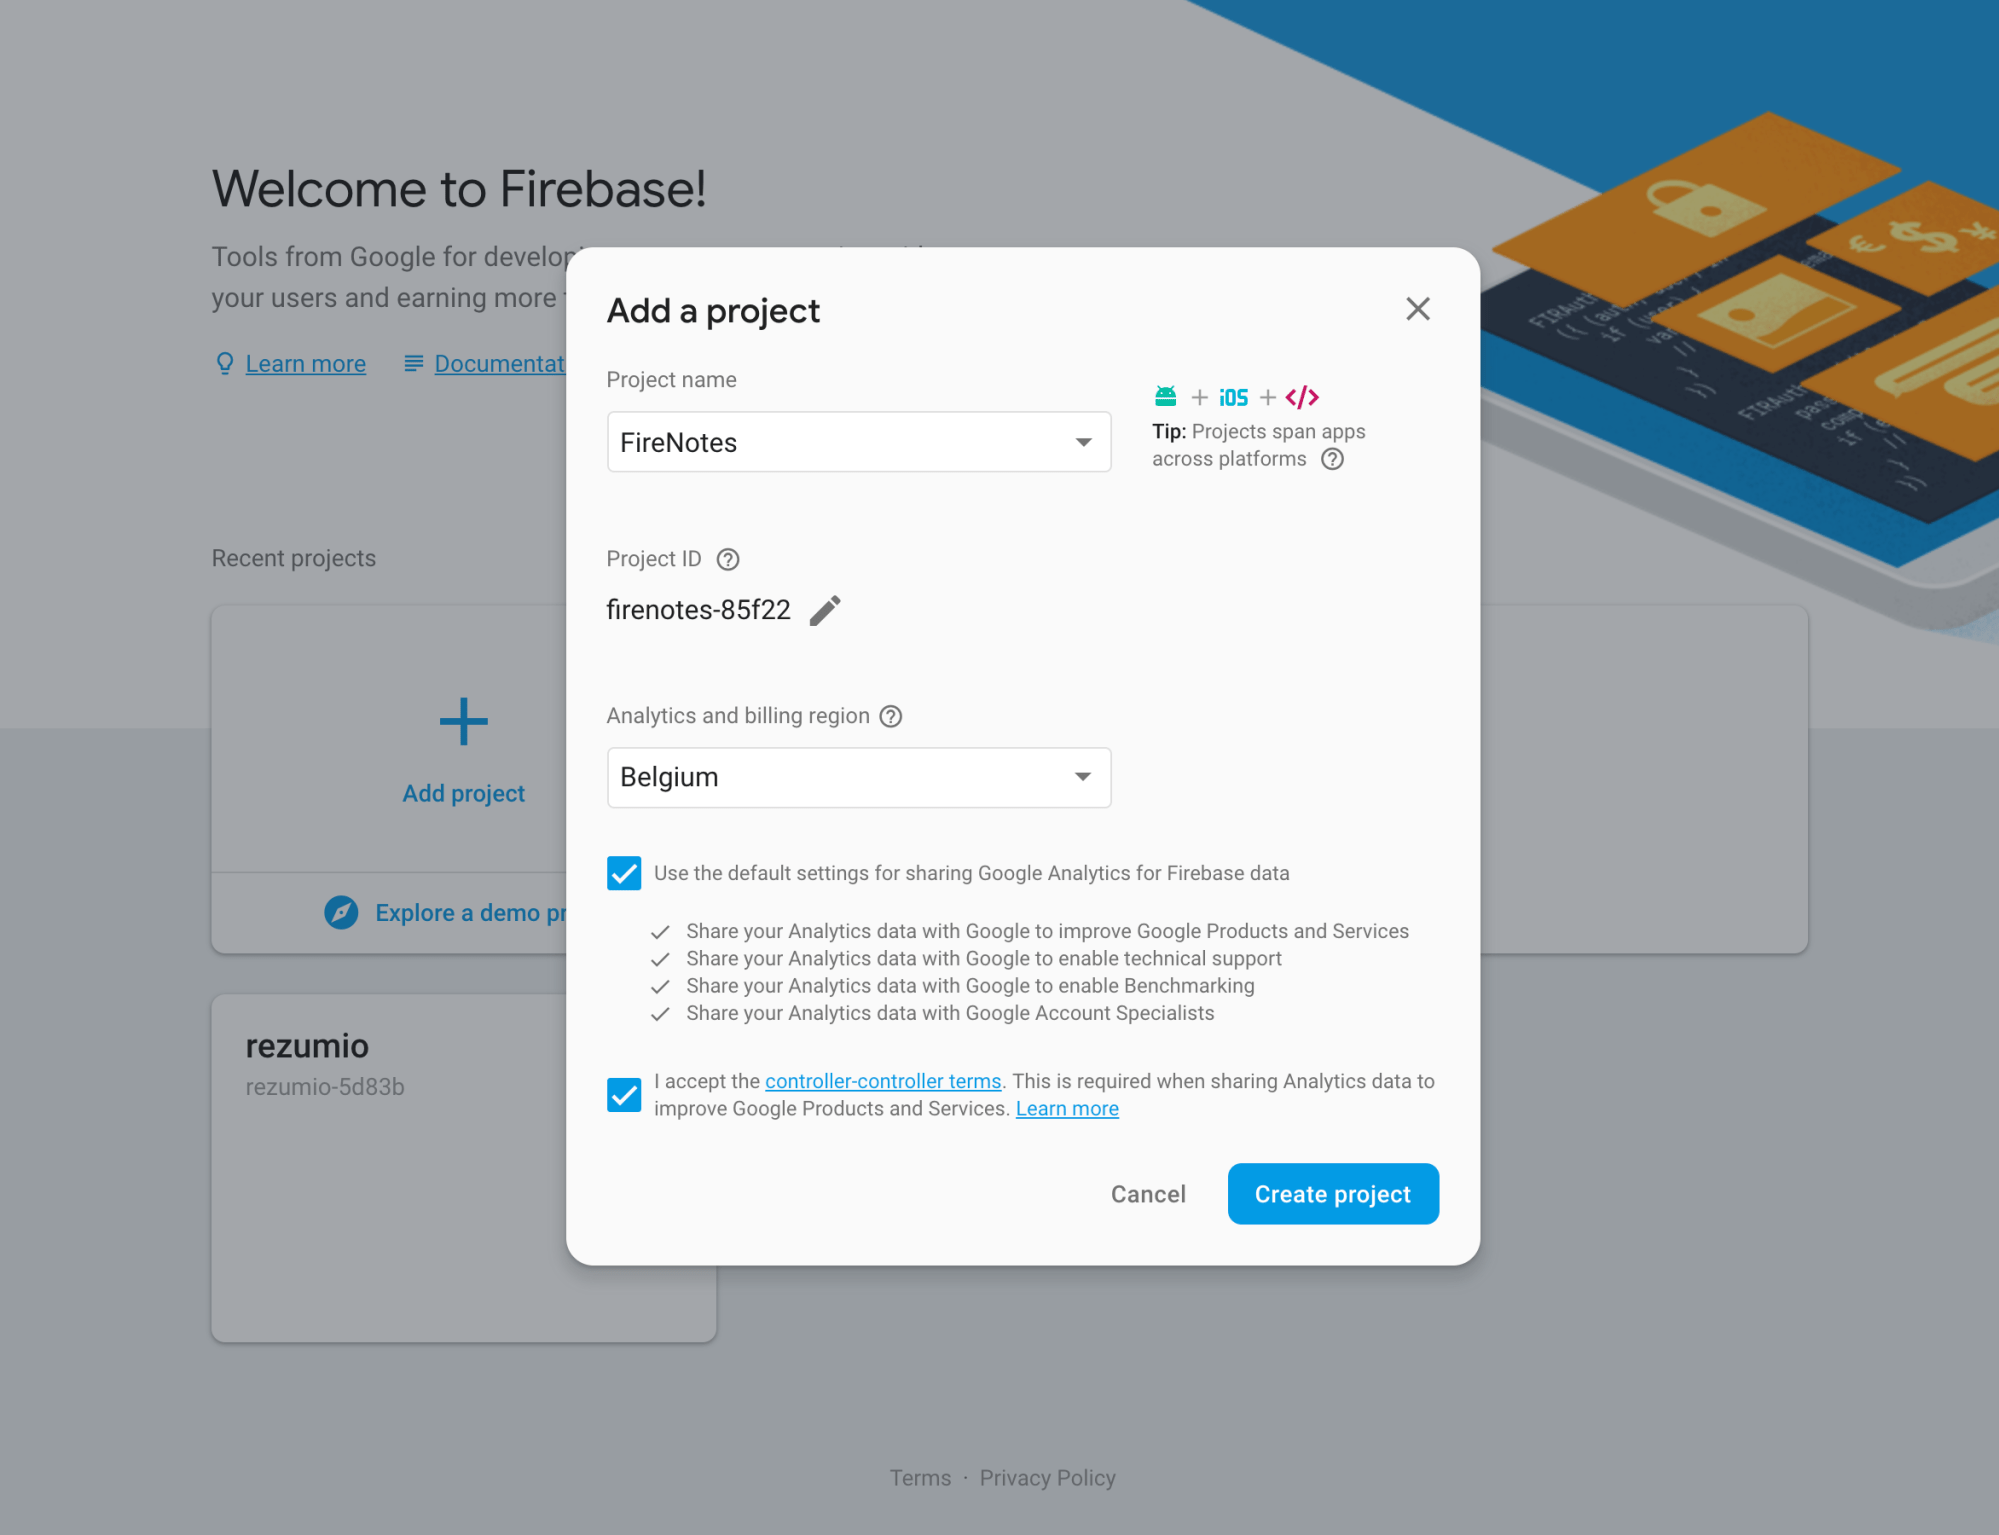
Head over to https://firebase.google.com/ and sign up with your Google account. Once that’s done, head over to the Firebase console and create a new project. I named mine ‘FireNotes’.
Since we will be using the Firestore database, head over to the ‘Database’ tab in the sidebar under the ‘Develop’ section and enable database usage in test mode*, as seen below.
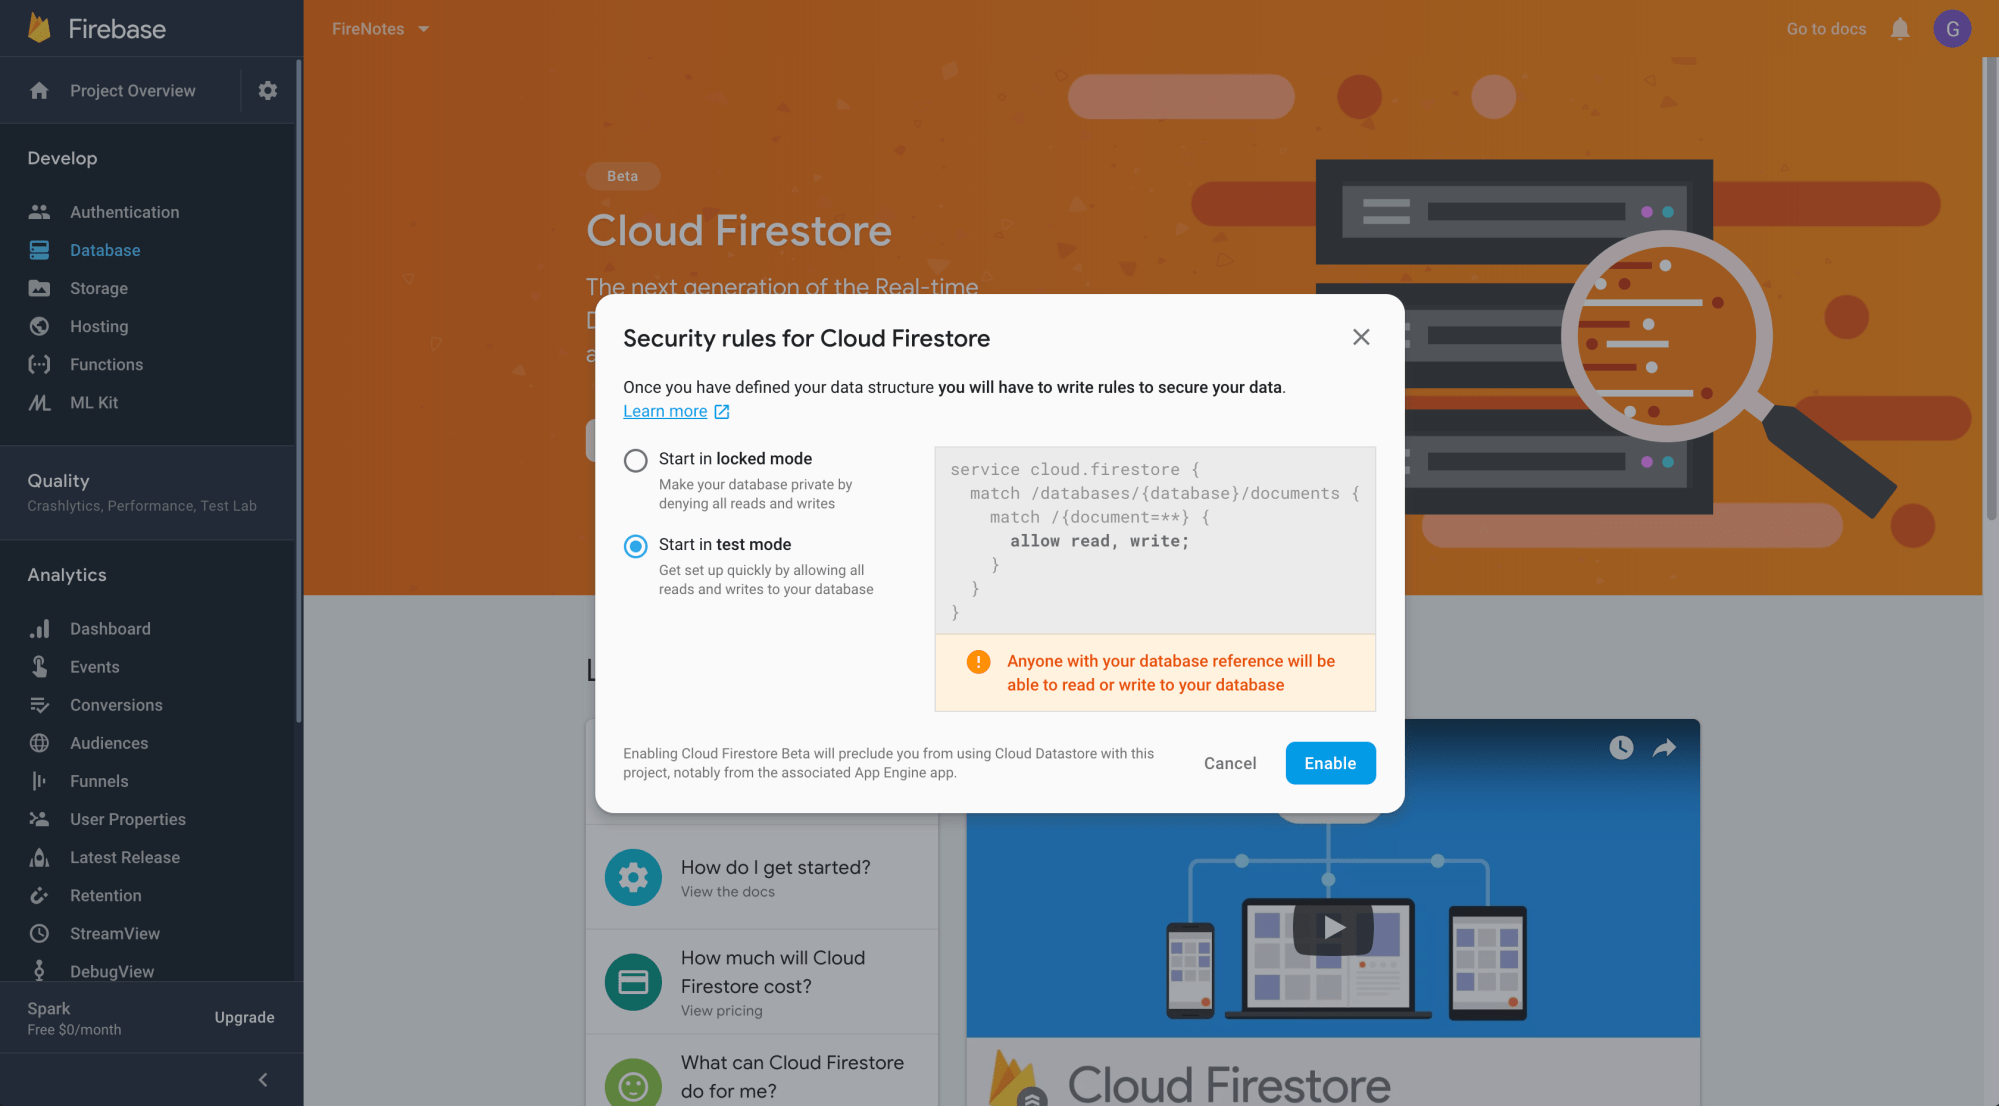
* Important notice: this will give everybody access to your database. If you plan on releasing a project with Firebase, please dig further into the documentation of database permissions and set it up properly.
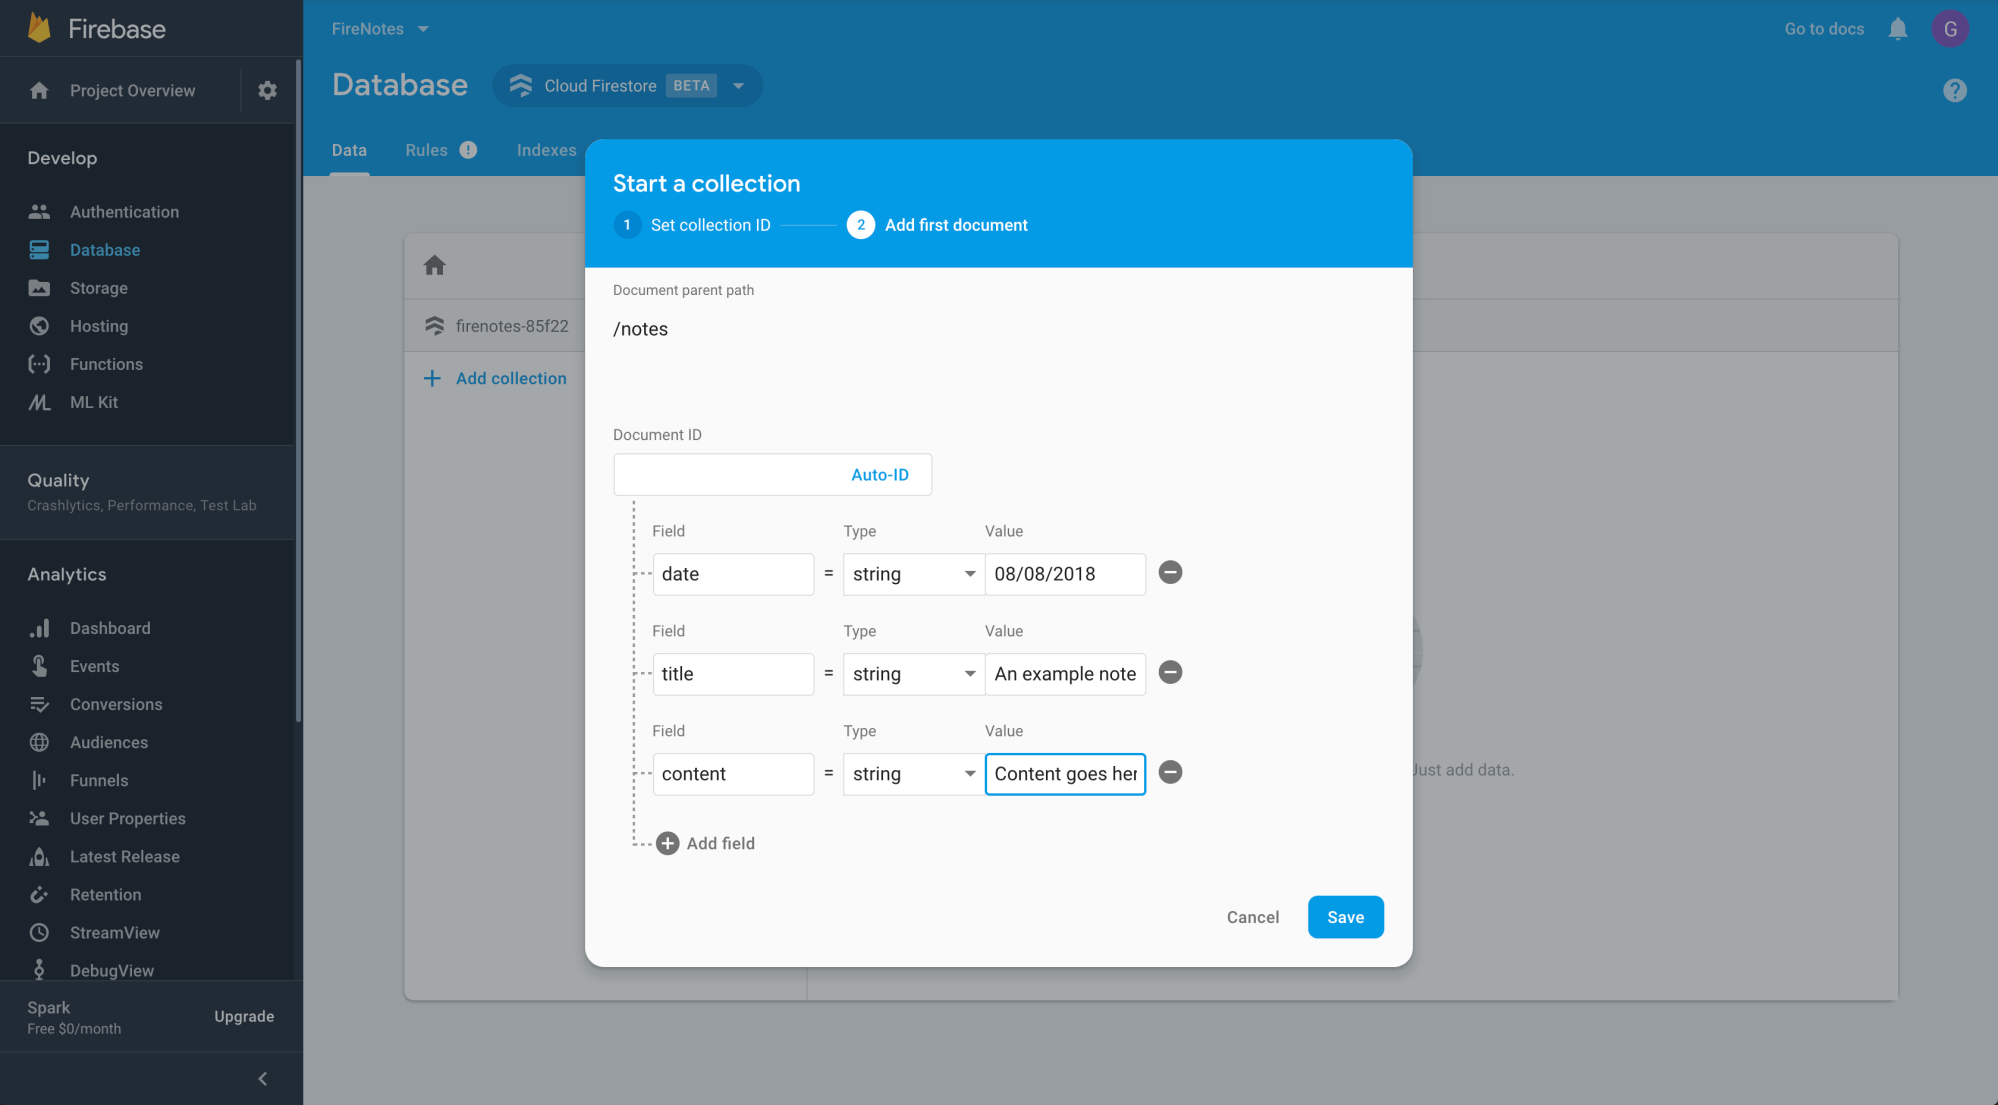
Next up, let’s add some notes in our database. Add a new collection and name it ‘notes’. This will be the parent collection where all our notes live. Populate it with some dummy notes like the screenshot below, containing an automatic ID, post date, title and content:
Step 2: Setting up our VueJS Project
Fairly easy so far, right? Let’s shift the focus on our application now.
Open up your console and navigate to your projects folder. Assuming you already have NPM installed, just install Vue CLI via the following command:
npm install -g @vue/cliNext, let’s kickstart your project using the following command:
vue create firenotesThis will prompt you with a choice for default or manual preset. For now, let’s start with the default option with NPM. Once installed, head over to your firenotes folder and start your webserver with following command:
npm run serveIf you navigate to the provided IP address (normally localhost:8080), you will see the standard ‘hello world’ view Vue provides:
Step 3: Creating the main layout
Next, let’s visualize what our application should look like. I’m not going through styling details in this blogpost, so I’ll use the ElementUI kit to speed things up.
# In your ~/projects/appname folder
npm install element-ui -S
Head over to /src/main.js and add the ElementUI imports, and register it into our VueJS app, right below the ‘import Vue’ as shown below:
import Vue from 'vue'

import ElementUI from 'element-ui'
import 'element-ui/lib/theme-chalk/index.css'
Vue.use(ElementUI)
Now we can start using ElementUI components in our templates. I’ve replaced the Vue logo with my own (download here), and changed the App.vue template as follows:
<template>
<div id="app">
<el-container>
<el-header>
<img class="logo" src="./assets/logo.png" />
</el-header>
<el-container>
<el-aside width="300px">
<el-menu
default-active="home"
class="el-menu-vertical-demo">
<el-menu-item index="home">
<i class="el-icon-menu"></i>
<span>Home</span>
</el-menu-item>
<el-menu-item index="notes">
<i class="el-icon-document"></i>
<span>Notes</span>
</el-menu-item>
</el-menu>
</el-aside>
<el-main>
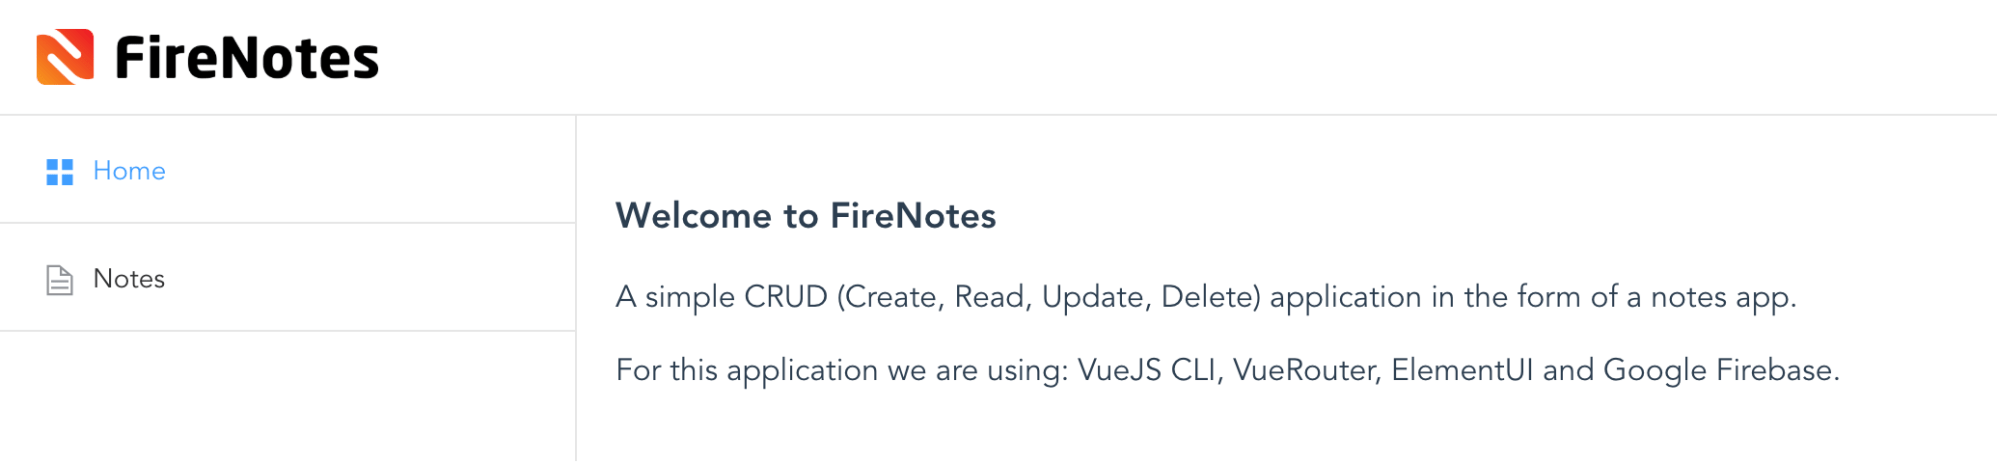
<h1>Welcome to FireNotes</h1>
<p>A simple CRUD (Create, Read, Update, Delete) application in the form of a notes app.</p>
<p>For this application we are using: VueJS CLI, VueRouter, ElementUI and Google Firebase.</p>
</el-main>
</el-container>
</el-container>
</div>
</template>
<script>
export default {
name: 'App'
}
</script>
<style>
html, body { margin: 0; }
#app {
font-family: 'Avenir', Helvetica, Arial, sans-serif;
-webkit-font-smoothing: antialiased;
-moz-osx-font-smoothing: grayscale;
color: #2c3e50;
}
.el-header { border-bottom: 1px solid #e6e6e6; display: flex; align-items: center; width: 100%; }
.el-header button { float: right; }
.el-menu-item { border-bottom: 1px solid #e6e6e6; }
.logo { max-width: 50%; max-height: 50%; margin-right: auto; }
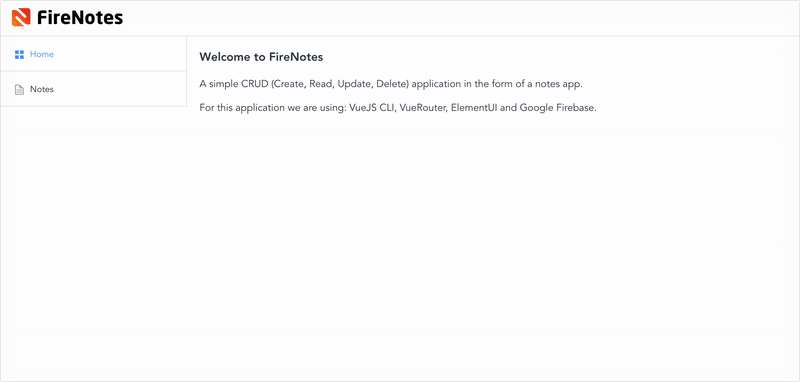
</style>Which makes it look like:
Step 4: Setting up our routes
So far so good! Next we can install vue-router, which is the official VueJS router. It deeply integrates with your VueJS application’s core, making single page applications a breeze. With vue-router we will be able to navigate to our notes page, which we will set up later.
# In your ~/projects/appname folder
npm install vue-router
Just like ElementUI, the vue-router needs to be imported and registered within our VueJS app. Head over to main.js and replace it with following code:
import Vue from 'vue'

import ElementUI from 'element-ui'
import 'element-ui/lib/theme-chalk/index.css'
Vue.use(ElementUI)

import VueRouter from 'vue-router'
Vue.use(VueRouter)

import App from '@/App'
import HelloWorld from '@/components/HelloWorld'
import Notes from '@/components/Notes'

const routes = [
  {
    path: '*',
    redirect: '/home'
  },
  {
    path: '/',
    redirect: '/home'
  },
  {
    path: '/home',
    name: 'HelloWorld',
    component: HelloWorld
  },
  {
    path: '/notes',
    name: 'Notes',
    component: Notes
  },
]

const router = new VueRouter({
  routes
})

new Vue({
  el: '#app',
  router: router,
  render: h => h(App),
  components: { App }
})
What happened here? Basically, we have specified the URLs of our two navigation items and assigned them to two different components. We’ve also included rules to automatically go to the homepage on load or whenever a URL triggers a non-registered route. Last but not least, we’ve registered the routes via ‘new VueRouter’, which is now embedded into our application core as it gets passed onto our ‘new Vue’ instance.
Now, saving this will probably cause some errors, since we didn’t do any work on the notes component yet. Let’s create a simple Notes.vue file inside the components folder.
<template>
  <div class="notes">
    Notes will go here
  </div>
</template>

<script>
export default {
  name: 'Notes'
}
</script>
Next, we need our app to display the correct components based on these specified routes. This will require some changes to our App.vue file on both the navigation and the content panel (el-main).
<template>
  <div id="app">
    <el-container>
      <el-header>
        <img class="logo" src="./assets/logo.png" />
      </el-header>
      <el-container>
        <el-aside width="300px">
          <el-menu
            default-active="home"
            :router="true"
            class="el-menu-vertical-demo">
            <el-menu-item index="home">
              <i class="el-icon-menu"></i>
              <span>Home</span>
            </el-menu-item>
            <el-menu-item index="notes">
              <i class="el-icon-document"></i>
              <span>Notes</span>
            </el-menu-item>
          </el-menu>
        </el-aside>
        <el-main>
          <router-view/>
        </el-main>
      </el-container>
    </el-container>
  </div>
</template>

<script>
export default {
  name: 'App'
}
</script>

<style>
  html, body { margin: 0; }
  #app {
    font-family: 'Avenir', Helvetica, Arial, sans-serif;
    -webkit-font-smoothing: antialiased;
    -moz-osx-font-smoothing: grayscale;
    color: #2c3e50;
  }
  .el-header { border-bottom: 1px solid #e6e6e6; display: flex; align-items: center; width: 100%; }
  .el-header button { float: right; }
  .el-menu-item { border-bottom: 1px solid #e6e6e6; }
  .logo { max-width: 50%; max-height: 50%; margin-right: auto; }
</style>
Here we added router=”true” to the component, which enables the ’s indexes to be used as ‘path’ to activate the route action. We also moved the introduction heading and paragraphs to HelloWorld.vue (you should too ;-)) and replaced it with <router-view/>. Now the router is fully responsible for which component is shown inside that panel. Awesome!
Next up we’ll tweak Notes.vue to actually display notes. For now, all content is static. Later, we will populate the notes table with data from our Firestore database.
<template>
<div class="notes">
<h1>
Notes
<el-button type="primary" size="medium"><i class="el-icon-circle-plus"></i> Add note</el-button>
</h1>
<el-table
:data="tableData"
border>
<el-table-column type="expand">
<template slot-scope="props">
<p>{{ props.row.details }}</p>
</template>
</el-table-column>
<el-table-column
label="Note title">
<template slot-scope="props">
{{ props.row.name }}
</template>
</el-table-column>
<el-table-column
label="Date added / modified"
prop="date">
</el-table-column>
<el-table-column
fixed="right"
label=""
width="90">
<template slot-scope="scope">
<el-button type="info" size="small" icon="el-icon-edit" circle></el-button>
<el-button type="danger" size="small" icon="el-icon-delete" circle style="margin-left: 5px;"></el-button>
</template>
</el-table-column>
</el-table>
</div>
</template>
<script>
export default {
name: 'Notes',
data() {
return {
tableData: [{
date: '2018-07-03',
name: 'Lorem ipsum dolor sit amet',
details: 'Lorem Ipsum is simply dummy text of the printing and typesetting industry. Lorem Ipsum has been the industrys standard dummy text ever since the 1500s, when an unknown printer took a galley of type and scrambled it to make a type specimen book.'
}, {
date: '2018-07-02',
name: 'Consectetur adipiscing',
details: 'Lorem Ipsum is simply dummy text of the printing and typesetting industry. Lorem Ipsum has been the industrys standard dummy text ever since the 1500s, when an unknown printer took a galley of type and scrambled it to make a type specimen book.'
}]
};
}
}
</script>
<style>
h1 { margin-top: 0; display: flex; align-items: center; width: 100%; }
.el-button { margin-left: auto; }
.el-collapse-item__header { font-size: 16px; }
.el-table { font-size: 14px; font-weight: 700; }
.el-table__expanded-cell p { font-size: 16px; font-weight: 400; }
.el-table th { background: #fafafa; }
.el-table th > .cell { color: #333; }
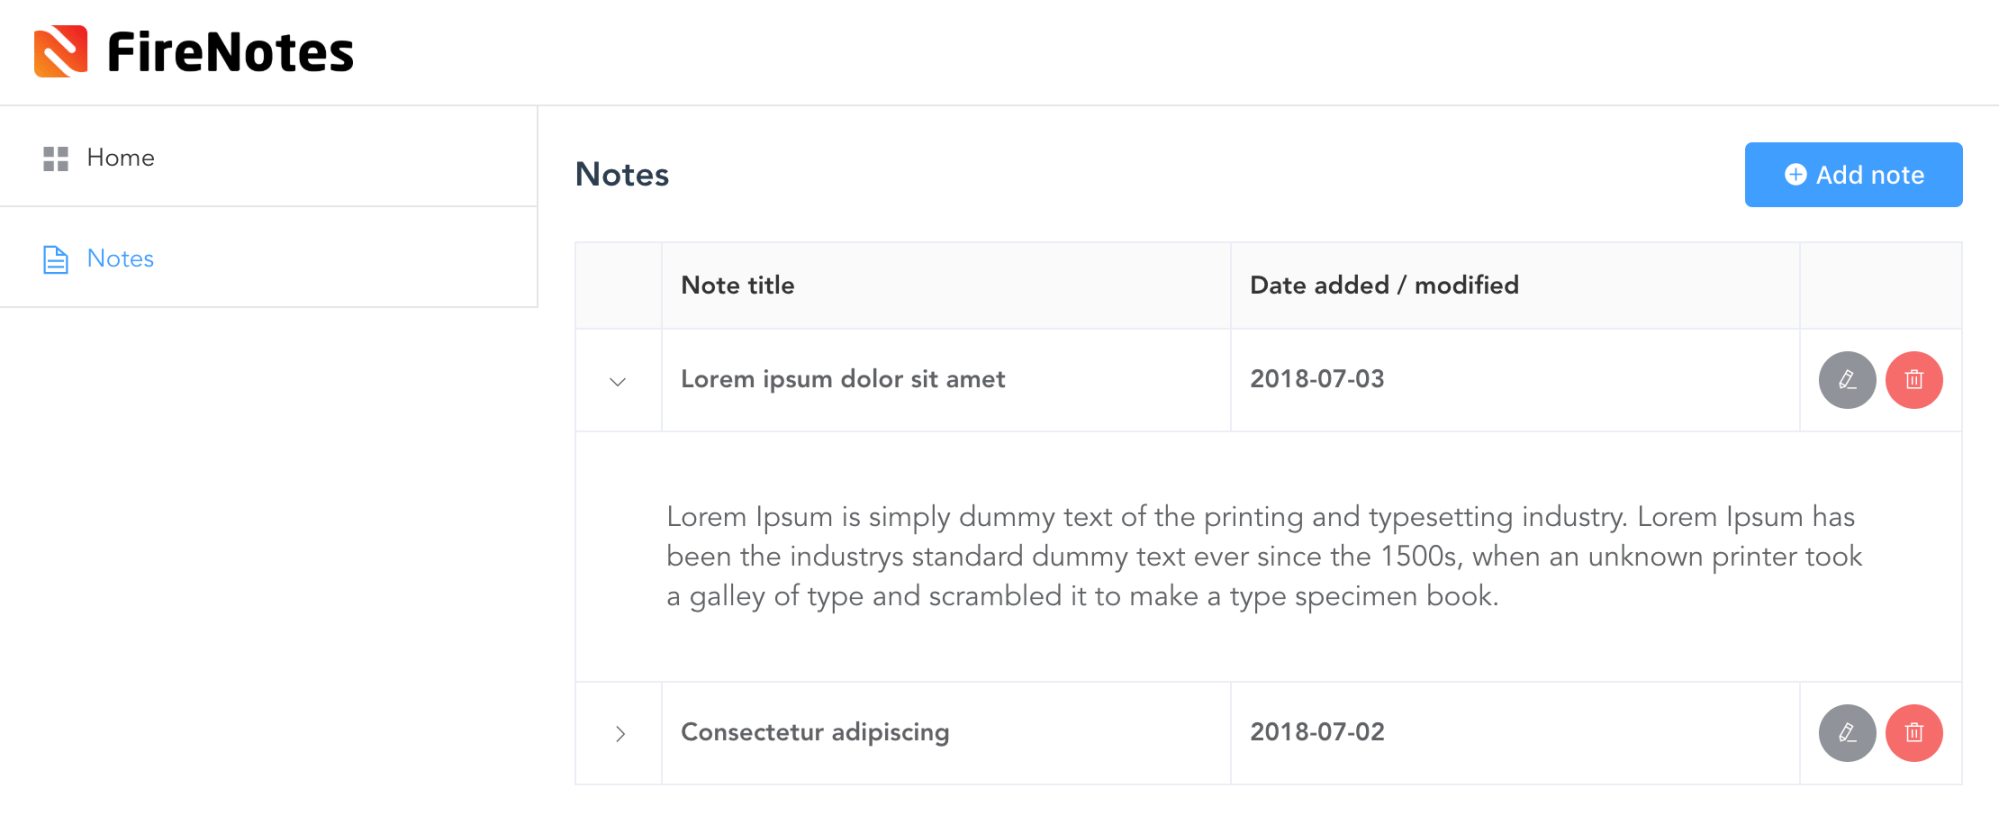
</style>Which makes it look like:
Step 5: Coupling Firebase with our project
Great! Now everything is in place for us to transform the static application to a Firestore data driven application. Let’s install the dependencies in order to connect with Firebase:
# In your ~/projects/appname folder
npm install firebase
import firebase from 'firebase'
import 'firebase/firestore'
firebase.initializeApp({
apiKey: '',
projectId: ''
})
export const db = firebase.firestore()
const settings = { timestampsInSnapshots: true }
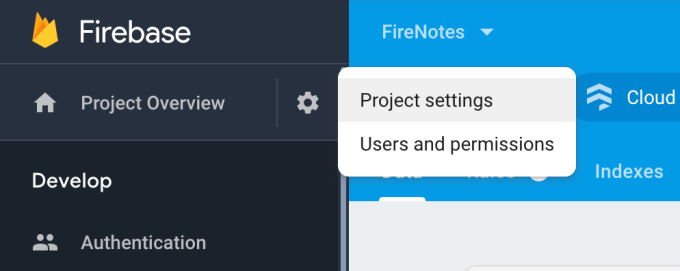
db.settings(settings)Here you still need to populate ‘apiKey’ and ‘projectId’, which can be found under the Project settings link via the cogwheel:
Next, head over to the Notes.vue component where we will empty the static array of notes and fill it with the ones we created in our Firestore database earlier on. We also defined an empty-text on the table, which will be shown while data is being loaded into our table.
<template>
  <div class="notes">
    <h1>
      Notes
      <el-button type="primary" size="medium"><i class="el-icon-circle-plus"></i> Add note</el-button>
    </h1>
    <el-table
      :data="tableData"
      empty-text="Loading, or no records to be shown."
      border>
      <el-table-column type="expand">
        <template slot-scope="props">
          <p>{{ props.row.content }}</p>
        </template>
      </el-table-column>
      <el-table-column
        label="Note title">
        <template slot-scope="props">
          {{ props.row.title }}
        </template>
      </el-table-column>
      <el-table-column
        label="Date added / modified"
        prop="date">
      </el-table-column>
      <el-table-column
        fixed="right"
        label=""
        width="90">
        <template slot-scope="scope">
          <el-button type="info" size="small" icon="el-icon-edit" circle></el-button>
          <el-button type="danger" size="small" icon="el-icon-delete" circle style="margin-left: 5px;"></el-button>
        </template>
      </el-table-column>
    </el-table>
  </div>
</template>

<script>
import { db } from '@/main'
export default {
  name: 'Notes',
  data() {
    return {
      tableData: []
    }
  },
  created () {
    db.collection('notes').get().then(querySnapshot => {
      querySnapshot.forEach(doc => {
        const data = {
          'id': doc.id,
          'date': doc.data().date,
          'title': doc.data().title,
          'content': doc.data().content
        }
        this.tableData.push(data)
      })
    })
  }
}
</script>

<style>
h1 { margin-top: 0; display: flex; align-items: center; width: 100%; }
.el-button { margin-left: auto; }
.el-collapse-item__header { font-size: 16px; }
.el-table { font-size: 14px; font-weight: 700; }
.el-table__expanded-cell p { font-size: 16px; font-weight: 400; }
.el-table th { background: #fafafa; }
.el-table th > .cell { color: #333; }
</style>
This makes the notes we manually added earlier in our Firestore database to be seen in our application making it a little bit less static. Great success!

What’s next?
In our follow-up blog post on this subject, we dig further into the remaining functionalities: creating, updating and deleting notes in our Firebase database, completely controlled by our VueJS app. Since we had a question in the comments on login functionality, we also added that as a bonus!
Questions, remarks?
Can’t get it to work? Need a more in depth explanation of certain bits of code? We’re all ears. Simply send us an e-mail (hello@aca-it.be) and we will get back to you as soon as possible!